Monday, December 1, 2008

KDE 4.1.3 na OpenSolarisu

OpenSolaris se poslední dobou hodně zlepšil, při instalaci už přestal ignorovat cizí oddíly a bez keců do grubu přidal položku Windows. Snad brzo dojde i na Linux a ostatní. Ve 2008.11 RC2 je skoro všechno co potřebuju, ale co mu chybí je KDE. Balíčky KDE3 se sice dají stáhnout z Blastwave, ale protože je to už mrtvý projekt, nemá cenu se tím zabývat. KDE4 se musí ručně zkompilovat. Když už zjistíte jak na to, není to nic těžkého:


Překladač:


To je asi nejbolavější místo. Použití gcc nebo Sun Studio Express (který je v opensolarisích repozitářích) vede k bizarním chybám, které ale lidi z kde-solaris projektu nezajímají, protože používají Sun Studio 12. Kdo chce s vlky býti ..., takže je nutno sehnat SS12. Aby to nebylo tak jednoduché, je bezpodmínečně nutné použít SS12 se všemi dostupnými patchi. Já jsem to vyřešil tak, že jsem si ve VirtualBoxu nainstaloval Solaris 10 10/08 a v něm potom Sun Studio 12 (pozor, je nutné použít "Download Package Installer", aby šly aplikovat patche).


Zazáplatování překladače:


Menu - Applications - Utilities - Update Manager
Je k tomu potřeba použít jméno a heslo - stačí to co bylo použito ke stažení Solarisu nebo SS.
Pak zmáčknout na Check for Updates a jít se projít.
Potom vybrat aktualizace a zmáčknout Install Updates a jít se projít.
(já jsem pro sichr zaktualizoval úplně všechno, takže jsem se šel projít dvakrát)


(dobrá sranda je, že okno pro registraci Update Managera se v rozlišení 1024x768 nevejde na obrazovku :-) Dá se to obejít tak, že si spodní panel přesunete na levou hranu obrazovky)


Jakmile bylo všechno hotovo, zataroval jsem celý adresář /opt/SUNWspro, přenesl jej do OpenSolarisu a tam zase rozbalil.


Dále uvedený postup je v podstatě uveden na stránce KDE on Solaris, kde by měly být vždycky uvedeny aktuální informace.


Nejprve stažení Common Build Environment, což je sada nástrojů, používaných při kompilaci GNOME a podobných molochů:


cd ~ ; mkdir CBE1.7 ; cd CBE1.7
wget http://dlc.sun.com/osol/jds/downloads/cbe/test/desktop-cbe-1.7.0-rc1-x86.tar.bz2
tar xjf desktop-cbe-1.7.0-rc1-x86.tar.bz2
desktop-cbe-1.7.0-rc1/cbe-install

Na všechny otázky by měla stačit výchozí odpověď.

Potom je potřeba nainstalovat pár balíčků, které jsou při překladu nezbytné a bez nich to vyhučí s (často) poměrně záhadnými hláškami:


pkg install SUNWarc (kvůli podpoře -xc99=lib)

pkg install SUNWj6dev (kvůli FOSSberkeley-db)

pkg install SUNWgnome-common-devel (kvůli pkg-config)

pkg install SUNWcups (FOSScups se mi prostě nedařilo přeložit)

pkg install SUNWmercurial (abych mohl stáhnout zdrojáky)

pkg install SUNWperl-xml-parser (kvůli FOSSsharedmimeinfo)


Pro překlad FOSSnas je díky chybě potřeba workaround:

/usr/sfw/bin/wget http://xorg.freedesktop.org/archive/individual/util/xorg-cf-files-1.0.2.tar.bz2
/usr/bin/bunzip2 -cd xorg-cf-files-1.0.2.tar.bz2 | tar -xvf -
cd xorg-cf-files-1.0.2
pfexec cp X11.rules /usr/X11/lib/X11/config/
pfexec cp X11.tmpl /usr/X11/lib/X11/config/
pfexec cp xorg.cf /usr/X11/lib/X11/config/
pfexec cp xorgsite.def /usr/X11/lib/X11/config/
pfexec cp xorgversion.def /usr/X11/lib/X11/config/
pfexec cp xf86.rules /usr/X11/lib/X11/config/
pfexec cp xfree86.cf /usr/X11/lib/X11/config/
pfexec touch /usr/X11/lib/X11/config/date.def
pfexec touch /usr/X11/lib/X11/config/host.def
pfexec cp Imake.tmpl /usr/X11/lib/X11/config/


Na PC s 1.5GB RAM a 512 MB swapu mi překlad některých balíčků vyhučel na nedostatku místa, takže jsem musel přidat swap. Na zfs se nedá použít swap do souboru, je potřeba změnit velikost svazku:

swap -d /dev/zvol/dsk/rpool/swap
zfs set volsize=2G rpool/swap
swap -a /dev/zvol/dsk/rpool/swap

(originál návod zde)


Stažení spec souborů KDE4:

cd ~ ; mkdir KDE4.X.x ; cd KDE4.X.x/
hg clone https://solaris.bionicmutton.org/hg/kde4-specs-dev
cd kde4-specs-dev/specs

A sestavení:
. /opt/dtbld/bin/env.sh
make


Přidání KDE do menu gdm:


Je třeba vytvořit soubor /usr/share/xsessions/kde.desktop, s následujícím obsahem:
[Desktop Entry]
Encoding=UTF-8
Name=KDE
Comment[en]=This session logs you into KDE
Exec=/opt/kde-4.1/bin/startkde
Icon=
Type=Application

KDE 4.1.3 na OpenSolarisu, obrázek 0

Následující problémy budou doufám brzo opraveny:


FOSSlibcdiowo a FOSSlibcdio selžou, v logu se objeví " ube: error: Illegal option to UBE: zla "
Řešením je ručně upravit configure.sh v ~/packages/SOURCES/Solaris-LIBCDIOWO-0.78.2.tar.gz a ~/packages/SOURCES/Solaris-LIBCDIO-0.78.2.tar.gz a odstranit nepodporovanou volbu zla (zero length arrays):

--- Solaris.orig/configure.sh 2008-11-29 10:41:16.819618183 +0100
+++ Solaris/configure.sh 2008-11-29 12:17:22.334741748 +0100
@@ -12,11 +12,6 @@
export CFLAGS="-xc99=%all ${CFLAGS}"
fi
-good_cflags=`echo ${CFLAGS} | grep -- "-Wu,-zla"`
-if [ "x${good_cflags}" = "x" ] ; then
-    export CFLAGS="${CFLAGS} -Wu,-zla"
-fi
-
good_cflags=`echo ${CFLAGS} | grep -- "-Xc"`
if [ "x${good_cflags}" != "x" ] ; then
export CFLAGS=`echo ${CFLAGS} | sed -e "s/-Xc//g"`


FOSSxine-lib selže, v logu se objeví pkgbuild: "pp.c", line 26: error: cannot find include file: <postproc/postproces
s.h>
.
Je nutno upravit planar.61.diff z ~/packages/SOURCES/Solaris-XINE-LIB-1.1.10.tar.gz, aby vypadal takto:

Index: src/post/planar/pp.c
===================================================================
--- old/src/post/planar/pp.c    (revision 2848)
+++ new/src/post/planar/pp.c    (working copy)
@@ -23,7 +23,7 @@
#include "xine_internal.h"
#include "post.h"
#include "xineutils.h"
-#include "postprocess.h"
+#include <ffmpeg/postproc/postprocess.h>
#include <pthread.h>
#define PP_STRING_SIZE 256 /* size of pp mode string (including all options) */

FOSSxine-lib selže i poté, ale trochu jinak. Tentokrát je v logu
pkgbuild: pkgbuild: File not found by glob: /var/tmp/pkgbuild-kdebuild/FOSSxine-lib-1.1.10-build/opt/foss/lib/xine/plugins/1.1.10/xineplug_vo_out_pgx32.so
pkgbuild: pkgbuild: File not found by glob: /var/tmp/pkgbuild-kdebuild/FOSSxine-lib-1.1.10-build/opt/foss/lib/xine/plugins/1.1.10/xineplug_vo_out_pgx64.so

PGX32 a PGX64 by měly být prehistorické grafické karty od Sunu, takže jsem dlouho nezkoumal, kde je problém a rovnou jsem ze souboru FOSSxine-libs.spec smazal řádky
%{_libdir}/xine/plugins/1.1.10/xineplug_vo_out_pgx32.so
%{_libdir}/xine/plugins/1.1.10/xineplug_vo_out_pgx64.so


FOSSboost selže, protože balíček s patchi pro solaris se jmenuje jinak než balíček se zdrojáky. Je potřeba jej přejmenovat:

wget http://solaris.bionicmutton.org/SRC/Solaris-BOOST-1.36.0.tar.gz -O ~/packages/SOURCES/Solaris-BOOST-1_36_0.tar.gz
Thursday, September 11, 2008

Jak Komerční banka o 60 Kč přišla

Zítra odjíždím na čtyři dny do Švýcarska a až teď mi došlo, že bych si měl sjednat i cestovní pojištění. Z googlu na mě jako první vybafla Komerčka, ale pak jsem se dočetl až k červeně zdůrazněné větě "Nastavení Vašeho počítače bohužel nesplňuje minimální požadavky na správný chod aplikace. Podrobnosti naleznete zde."
Takže nazdar pánové. Druhá v pořadí - ČSOB - už předsudky proti FF3 neměla (a vypadá to, že i Konqueror by prošel), takže jsem jí během dvou minut poslal 60 korun a ona mně zase pojistnou smlouvu.

Saturday, August 30, 2008

iDuino - mám je

Jak jsem psal, objednal jsem si 5. srpna od Fundamental Logic 5ks iDuino.


Potvrzení mi přišlo hned, za dva dny pak že se čeká na sestavení. A potom dlouho nic. Na webu sice mají napsáno, že sestavení může trvat až pět pracovních dní, ale 14. srpna už mi to přišlo poněkud moc, tak jsem se připomněl decentním mailem. Druhý den mi odpověděl Kevin Bralten, že jim akorát dorazily od dodavatele a testují je. Zpoždění prý měl na svědomí dodavatel. 21. srpna mi pak dorazily dva maily - jeden od PayPalu a druhý od FL, informující o tom, že balíček veze Canada Post.

Balíček, jedna bublinková obálka v druhé, jsem měl ve schránce přesně tři týdny po objednání - v úterý, ale až teď jsem se dostal k tomu je vyzkoušet - byla to opravdu hračka - z menu vybrat 'Examples-Digital-Blink' na blikání LED, v 'Tools-Serial Port' vybrat /dev/ttyUSB0 a pak jen 'Upload to I/O Board'. Abych měl jistotu, zkusil jsem ještě komunikaci s PC - 'Examples-Communication-ASCIITable' posílá do počítače ASCII tabulku.


Nakonec jsem neplatil žádné clo ani DPH, takže mě jeden kus vyšel na 388,20 Kč. Jeden už je zamluvený, takže 1-2 mohu někomu odprodat.


Friday, August 29, 2008

smysluplně strávený večer

Neinstaluj Windows na stroj s Linuxovými oddíly.
Když už instaluješ a instalace Windows se kvůli přítomnosti Linuxových oddílů zasekne, nemaž MBR a radši se na to vykašli.
Když už mažeš MBR, tak si ho předtím zazálohuj.
Když už sis ho nezazálohoval, použij na obnovení testdisk, parted je k ničemu.

Saturday, August 16, 2008

man2po2tmx2po2man \n bug


Tento zápisek slouží pouze jako podklad pro bugreport. Navíc je anglicky.

This entry is just an attachment to a bugreport. Nothing interesting here.


My goal is to move the current Linux manual pages translation framework (translating to czech) to OmegaT. As OmegaT handles .properties and .po files only, I'm using po4a to transform the man pages to po files and back. To ease the transition I'm creating translation memories from existing translations using po2tmx.


The original en/intro.1 looks like this:

...
.BI "knuth login: " aeb
.BI "Password: " ********
.BI "% " date
Tue Aug  6 23:50:44 CEST 2002
.BI "% " cal
August 2002
Su Mo Tu We Th Fr Sa
1  2  3
4  5  6  7  8  9 10
11 12 13 14 15 16 17
18 19 20 21 22 23 24
25 26 27 28 29 30 31
.BI "% " ls
...

Its czech translation cs/intro.1 looks like this:
...
.BI "knuth login: " aeb
.BI "Password: " ********
.BI "% " date
Út Srp  6 23:50:44 CEST 2002
.BI "% " cal
Srpen 2002
Ne Po Út St Čt Pá So
1  2  3
4  5  6  7  8  9 10
11 12 13 14 15 16 17
18 19 20 21 22 23 24
25 26 27 28 29 30 31
.BI "% " ls
...


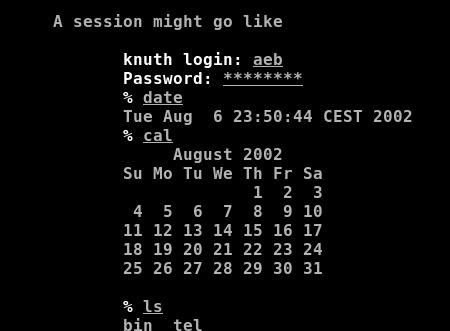
This is how it looks when viewed using man en/intro.1 or man cs/intro.1:


To create a po file from the man pages I use the following command:

$ po4a-gettextize -f man -m en/intro.1 -l cs/intro.1 -L utf8 -p intro.1.po

The relevant part of the created intro.1.po file looks like this:
...
# type: Plain text
#: en/intro.1:106
#, fuzzy, no-wrap
msgid ""
"B<knuth login: >I<aeb>\n"
"B<Password: >I<********>\n"
"B<% >I<date>\n"
"Tue Aug  6 23:50:44 CEST 2002\n"
"B<% >I<cal>\n"
"     August 2002\n"
"Su Mo Tu We Th Fr Sa\n"
"             1  2  3\n"
" 4  5  6  7  8  9 10\n"
"11 12 13 14 15 16 17\n"
"18 19 20 21 22 23 24\n"
"25 26 27 28 29 30 31\n"
msgstr ""
"B<knuth login: >I<aeb>\n"
"B<Password: >I<********>\n"
"B<% >I<date>\n"
"Út Srp  6 23:50:44 CEST 2002\n"
"B<% >I<cal>\n"
"     Srpen 2002\n"
"Ne Po Út St Čt Pá So\n"
"             1  2  3\n"
" 4  5  6  7  8  9 10\n"
"11 12 13 14 15 16 17\n"
"18 19 20 21 22 23 24\n"
"25 26 27 28 29 30 31\n"
...

I have to remove the ', fuzzy' indications that were automatically inserted by po4a, otherwise po2tmx would ignore all the messages:
$ sed -i 's/, fuzzy//' intro.1.po

Because of bug 2021007 in OmegaT, I also have to remove the strings ', no-wrap' from the po file:
$ sed -i 's/, no-wrap//' intro.1.po

Then I create a tmx file from the po file:
$ po2tmx -l cs -i intro.1.po -o intro.1.tmx

The relevant part of the intro.1.tmx file looks like this:
...
<tu>
<tuv xml:lang="en">
<seg>B&lt;knuth login: &gt;I&lt;aeb&gt;
B&lt;Password: &gt;I&lt;********&gt;
B&lt;% &gt;I&lt;date&gt;
Tue Aug  6 23:50:44 CEST 2002
B&lt;% &gt;I&lt;cal&gt;
August 2002
Su Mo Tu We Th Fr Sa
1  2  3
4  5  6  7  8  9 10
11 12 13 14 15 16 17
18 19 20 21 22 23 24
25 26 27 28 29 30 31
</seg>
</tuv>
<tuv xml:lang="cs">
<seg>B&lt;knuth login: &gt;I&lt;aeb&gt;
B&lt;Password: &gt;I&lt;********&gt;
B&lt;% &gt;I&lt;date&gt;
Út Srp  6 23:50:44 CEST 2002
B&lt;% &gt;I&lt;cal&gt;
Srpen 2002
Ne Po Út St Čt Pá So
1  2  3
4  5  6  7  8  9 10
11 12 13 14 15 16 17
18 19 20 21 22 23 24
25 26 27 28 29 30 31
</seg>
</tuv>
</tu>
...

Then I launch OmegaT, select 'Project'->'New' and give 'manpagestest' as the new project's name. The Source files language is en-us, target language is cs. Sentence-level segmenting is disabled. I quit the project.

Then I copy the tmx to the project:
$ cp intro.1.tmx manpagestest/tm/

Then I create an english po file from the original man page and place it to the source directory of the project:
$ po4a-gettextize -f man -m en/intro.1 -p manpagestest/source/intro.1.po


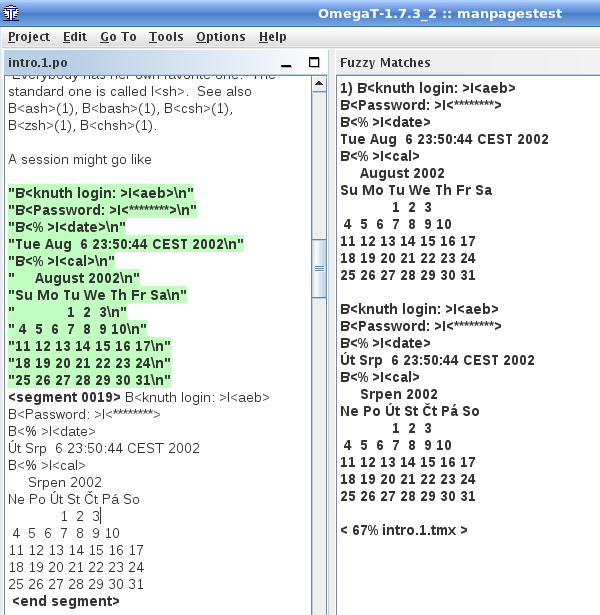
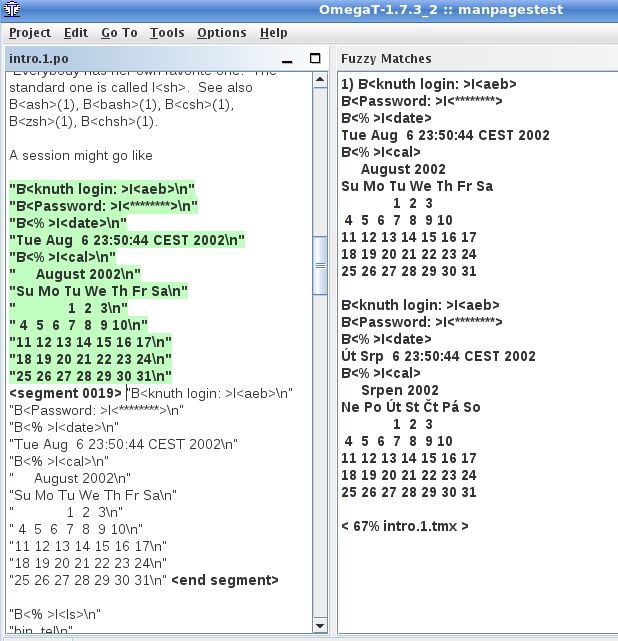
Then I launch OmegaT, open the manpagestest project and click on the intro.1.po file to edit it. When I change to the message containing the calendar, I can see that the suggested translation (based on the tmx) is not 100% as with other strings, it's only 67 % :


Still hoping it will turn out ok I put the fuzzy match as new translation:


save the project and click 'Project'->'Create translated documents'. I close OmegaT now.


The relevant part of the translated manpagestest/target/intro.1.po file now looks like this:

...
# type: Plain text
#: en/intro.1:106
#, no-wrap
msgid ""
"B<knuth login: >I<aeb>\n"
"B<Password: >I<********>\n"
"B<% >I<date>\n"
"Tue Aug  6 23:50:44 CEST 2002\n"
"B<% >I<cal>\n"
"     August 2002\n"
"Su Mo Tu We Th Fr Sa\n"
"             1  2  3\n"
" 4  5  6  7  8  9 10\n"
"11 12 13 14 15 16 17\n"
"18 19 20 21 22 23 24\n"
"25 26 27 28 29 30 31\n"
msgstr B<knuth login: >I<aeb>
B<Password: >I<********>
B<% >I<date>
Út Srp  6 23:50:44 CEST 2002
B<% >I<cal>
Srpen 2002
Ne Po Út St Čt Pá So
1  2  3
4  5  6  7  8  9 10
11 12 13 14 15 16 17
18 19 20 21 22 23 24
25 26 27 28 29 30 31
...

Obviously this is already wrong but for the sake of the experiment, I'm going on:
$ po4a-translate -f man -m en/intro.1 -p manpagestest/target/intro.1.po -l intro.cs.1
...
manpagestest/target/intro.1.po:134: (po4a::po)
Strange line: --><--
manpagestest/target/intro.1.po:165: (po4a::po)
Strange line: -->msgstr B<knuth login: >I<aeb><--
manpagestest/target/intro.1.po:166: (po4a::po)
Strange line: -->B<Password: >I<********><--
manpagestest/target/intro.1.po:167: (po4a::po)
Strange line: -->B<% >I<date><--
manpagestest/target/intro.1.po:168: (po4a::po)
Strange line: -->Út Srp  6 23:50:44 CEST 2002<--
manpagestest/target/intro.1.po:169: (po4a::po)
Strange line: -->B<% >I<cal><--
manpagestest/target/intro.1.po:170: (po4a::po)
Strange line: -->     Srpen 2002<--
manpagestest/target/intro.1.po:171: (po4a::po)
Strange line: -->Ne Po Út St Čt Pá So<--
manpagestest/target/intro.1.po:172: (po4a::po)
Strange line: -->             1  2  3<--
manpagestest/target/intro.1.po:173: (po4a::po)
Strange line: --> 4  5  6  7  8  9 10<--
manpagestest/target/intro.1.po:174: (po4a::po)
Strange line: -->11 12 13 14 15 16 17<--
manpagestest/target/intro.1.po:175: (po4a::po)
Strange line: -->18 19 20 21 22 23 24<--
manpagestest/target/intro.1.po:176: (po4a::po)
Strange line: -->25 26 27 28 29 30 31<--
manpagestest/target/intro.1.po:236: (po4a::po)
Strange line: --><--
manpagestest/target/intro.1.po:309: (po4a::po)
Strange line: --><--
...

as you can see, po4a complains about some extra blank lines in the file and also does not like at all the translated part. This is because po4a expects the message to have opening and closing doublequotes, and to have them on each line (a bug in OmegaT?). I fix that manually:
$ cp manpagestest/target/intro.1.po manpagestest/target/intro.1.fixed.po
$ vi manpagestest/target/intro.1.fixed.po
$ cat manpagestest/target/intro.1.fixed.po
...
# type: Plain text
#: en/intro.1:106
#, no-wrap
msgid ""
"B<knuth login: >I<aeb>\n"
"B<Password: >I<********>\n"
"B<% >I<date>\n"
"Tue Aug  6 23:50:44 CEST 2002\n"
"B<% >I<cal>\n"
"     August 2002\n"
"Su Mo Tu We Th Fr Sa\n"
"             1  2  3\n"
" 4  5  6  7  8  9 10\n"
"11 12 13 14 15 16 17\n"
"18 19 20 21 22 23 24\n"
"25 26 27 28 29 30 31\n"
msgstr "B<knuth login: >I<aeb>"
"B<Password: >I<********>"
"B<% >I<date>"
"Út Srp  6 23:50:44 CEST 2002"
"B<% >I<cal>"
"     Srpen 2002"
"Ne Po Út St Čt Pá So"
"             1  2  3"
" 4  5  6  7  8  9 10"
"11 12 13 14 15 16 17"
"18 19 20 21 22 23 24"
"25 26 27 28 29 30 31"
...

and retry:
$ po4a-translate -f man -m en/intro.1 -p manpagestest/target/intro.1.fixed.po -l intro.cs.1

The important part of the created intro.cs.1 looks like this:
...
\fBknuth login: \fP\fIaeb\fP\fBPassword: \fP\fI********\fP\fB% \fP\fIdate\fPÚt Srp  6 23:50:44 CEST 2002\fB% \fP\fIcal\fP     Srpen 2002Ne Po Út St Čt Pá So             1  2  3 4  5  6  7  8  9 1011 12 13 14 15 16 1718 19 20 21 22 23 2425 26 27 28 29 30 31
...


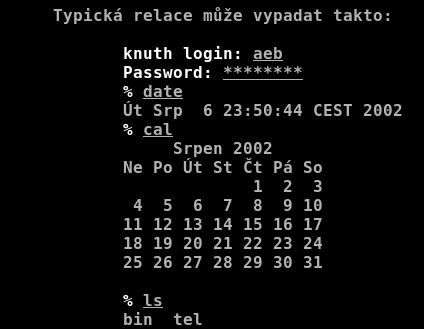
and this is how it looks when viewed with man ./intro.cs.1, i.e. badly:


All the mentioned files are attached.


Tuesday, August 5, 2008

iDuino


Na svém oblíbeném hackaday.com jsem po vlně různých hacků s platformou Arduino (Vývojová sada s procesorem ATmega168, opensource je hardware i software, soft je multiplatformní) narazil na zprávičku o stickDuino, forku Arduina, který lze zasunout přímo do USB portu. To mě, spolu s informací, že to prodávají za 20 USD, navnadilo. Dolar je dneska za ~15 Kč a to už vychází o něco líp než 770 Kč za echt Arduino Diecimila v českém shopu. Nakonec jsem se ale rozhodl pro iDuino.


iDuino se k PC připojuje pomocí USB s Mini-B konektorem (to je ten malej k digitálním foťákům apod.). Jeho velkou výhodou je maximální kombinovatelnost s nepájivými kontaktními poli.


V procesoru, který je na desce, zabírá 2kB z 16kB bootloader, díky kterému je nahrávání programů jednoduché. Ale pomocí jednoduchých triků se dá deska použít i k programování čistých procesorů, a to i Mega8, Tiny2313 a Tiny13.


Minimální objednávka už hotové desky byla 5ks. 2-3 kusy určitě využiju, ale zbylé dva klidně prodám za náklady (cca 390 Kč, ale asi k tomu přijde i DPH a clo, nechám se překvapit). Takže pokud máte někdo zájem, tak se ozvěte.


Jo a taky díky tomu jsem si dneska konečně aktivoval účet na PayPalu.
Nejdřív jsem musel zavolat na linku Servis24 spořky a nastavit "limity pro transakce bez fyzické přítomnosti karty" (přes web to nejde a hodinu na pobočce se mi trávit nechtělo). Nejdřív mi slečna řekla, že to bude aktivovaný až ve středu, že jim to tak prostě v systému chodí, ale když jsem vyjádřil rozčarování, tak z ní vylezlo, že za 50 Kč to můžu mít expres za 30 minut. No tak jo. Asi za hodinu jsem to zkusil, v internetbankingu sice ještě změna nebyla, ale PayPal už mi kartu ověřil.


Monday, July 28, 2008

Acceleration of Suguri

Když jsem zažil nečekaní úspěch s Neverhood, podíval jsem se po AppDB wine po dalších hrách s hodnocením Platinum a Gold. Hned u A mě zaujala svým názvem hra Acceleration of Suguri. Stáhnul jsem a ono to zase bez problémů fungovalo... Takhle budu muset za chvíli přejít na další OS, jinak nic užitečnýho neudělám ;-)


Je to jednoduchá arkáda, ale s krásnými postavičkami a veselou hudbou. Hrát se dá proti kamarádovi u počítače, přes síť anebo proti počítači. Trial má oproti plné verzi jen 3 holky - Suguri se světelným mečem, Saki s výbušnými kužely a Iru s plazmovou pistolí. Dále jsou k dispozici jen dvě scény - Forest a Lake. Myslím ale, že to vůbec nevadí, ono se to docela rychle omrzí.


Acceleration of Suguri
A tady video na youtube, omluvte zhoršenou kvalitu, točil jsem to foťákem, aby tam byl i zvuk.

Systémové požadavky: CPU 1.2 GHz, RAM 256 MB, Video RAM 32MB, DirectX 8.1a


Příjemně mě překvapilo, že je to naprosto v pohodě hratelné i na notesu s přesně 32 MB VRAM.

Jak na to:
$ wget http://www.shindenken.org/daidai/AoSuguriTrial.zip
$ unzip AoSuguriTrial.zip
$ cd AoSuguriTrial
$ pasuspender wine AoSuguriTrial.exe


Sice je to podrobně japonsky popsáno na stránkách hry :-), ale neškodí si připomenout ovládání:


Menu:


Šipky

Z potvrzuje výběr


Hra:


Z normální útok

ZZ zesílený útok

X útok

XX zesílený útok

C speciální útok, je dostupný až poté, co několikrát zasáhnete protivníka. Velká číslice v půlkolečku nahoře ukazuje, kolik je jich k dispozici.

V rychlý pohyb

Z+X

A+Z útok ruční zbraní

A+X útok ruční zbraní na větší vzdálenost

A+C

S štít (je dostupný až poté, co několikrát zasáhnete protivníka - viz nápis SHIELD)

T menu

Esc odchod do OS


K nastavení síťové hry slouží config.exe, na třetí záložce je třeba nastavit IP adresu protivníka, ten musí udělat to samé. OK je to tlačítko vpravo.

Acceleration of Suguri

Bohužel síťová hra je trochu rozbitá, postavy na lokálním a vzdáleném stroji se liší a nesedí ani jejich poloha, takže u sebe souseda trefím, ale na jeho obrazovce minu.


Sunday, July 27, 2008

zabitej den


Včerejšek nebyl zrovna nejproduktivnější. Nejdřív jsem se konečně podíval na (1. díl) IT Crowd. Není to špatný, ale ty vtipy jsou většinou strašně předvídatelný.
No a pak jsem si pod vlivem zprávičky o další verzi Wine nainstaloval starou pecku Neverhood. Wine v MDV 2008.1 je sice jen ve verzi 0.9.58 (v Backports je 1.1.2, ale nemám je zapnuté, momentálně upřednostňuju stabilitu před bleeding edge), ale i tak to proběhlo naprosto bez potíží. Wine se musí nastavit jako Windows 95. Aby fungoval zvuk, je kvůli PulseAudio potřeba změnit ovladač zvuku ve winecfg na OSS (s esd to dost blblo, často byl místo zvuku jen šum) a taky spouštět wine s pasuspender (viz tady). Dohrál jsem to ve 4 ráno ...


Thursday, July 3, 2008

Customizing Asus AM200g - V. firmware modification

I would not dare to upload a firmware built from scratch, but what about only slightly modified one?

For me, it would suffice to just add a call to some script on the flash drive that would be launched at boot. From there I'd be able to do all I need (ATM).

The WL-600g GPL Makefile contains the following default sequence of commands in its buildimage section:

./buildFS
$(HOSTTOOLS_DIR)/mksquashfs $(TARGET_FS) $(PROFILE_DIR)/rootfs.img -noappend -be -lzma -no-fragments -noI
$(OBJCOPY) -O binary vmlinux vmlinux.bin
$(HOSTTOOLS_DIR)/cmplzma -k -2 vmlinux vmlinux.bin vmlinux.lz;\
$(HOSTTOOLS_DIR)/bcmImageBuilder --output $(CFE_FS_KERNEL_IMAGE_NAME) --chip $(BRCM_CHIP) --board $(BRCM_BOARD_ID) \
--productname $(CUSTOMER_PRODUCT_NAME) --blocksize $(BRCM_FLASHBLK_SIZE) --cfefile $(CFE_FILE) --rootfsfile rootfs.img --kernelfile vmlinux.lz --include-cfe;

Let's keep hoping that WL-600g is the same as AM-200g, try to reverse the process, do the modifications and put together again.
bcmImageBuilder should just put together the filesystem file, kernel, cfe file (st like bios - see OpenWRT - Everything you need to know about broadcom hardware (Part 1)) and some checksums. There is a utility done by OpenWRT people that should be a replacement of bcmImageBuilder. Here. From there I learned the structure of the header, let's repeat it here for the sake of completeness:
The header takes the first 256 bytes

/* Image component */
struct imagecomp {
uint8_t                 address[12];    /* Address of this component as ASCII */
uint8_t                 len[10];        /* Length of this component as ASCII */
};
/* Image tag */
struct imagetag {
uint8_t                 tagver[4];      /*   0 -   3: Version of the tag as ASCII (2) */
uint8_t                 sig1[20];       /*   4 -  23: BCM_MAGIC_1 */
uint8_t                 sig2[14];       /*  24 -  37: BCM_MAGIC_2 */
uint8_t                 chipid[6];      /*  38 -  43: Chip id as ASCII (6345) */
uint8_t                 boardid[16];    /*  44 -  59: Board id as ASCII (96345GW2, etc...) */
uint8_t                 bigendian[2];   /*  60 -  61: "1" for big endian, "0" for little endian */
uint8_t                 imagelen[10];   /*  62 -  71: The length of all data that follows */
struct imagecomp        cfe;            /*  72 -  93: The offset and length of CFE */
struct imagecomp        rootfs;         /*  94 - 115: The offset and length of the root file system */
struct imagecomp        kernel;         /* 116 - 137: The offset and length of the kernel */
uint8_t                 dualimage[2];   /* 138 - 139: use "0" here */
uint8_t                 inactive[2];    /* 140 - 141: use "0" here */
uint8_t                 reserved1[74];  /* 142 - 215: reserved */
uint32_t                imagecrc;       /* 216 - 219: crc of the images (net byte order) */
uint8_t                 reserved2[16];  /* 220 - 235: reserved */
uint32_t                headercrc;      /* 236 - 239: crc starting from sig1 until headercrc (net byte order) */
uint8_t                 reserved3[16];  /* 240 - 255: reserved */
};

Let's decompose it for the firmware from Joyce:
tagver="36 00 00 00" = "6..."
sig1="42 72 6f 61 64 63 6f 6d 20 43 6f 72 70 6f 72 61 74 69 6f 00" = "Broadcom Corporatio."
sig2="76 65 72 2e 20 32 2e 30 00 00 00 00 00 00" = "ver. 2.0......"
chipid="36 33 34 38 00 00" = "6348.."
boardid="39 36 33 34 38 47 57 2d 31 31 00 00 00 00 00 00" = "96348GW-11......"
bigendian="31 00" = "1"
imagelen="33 38 32 32 33 35 36 00 00 00" = "3822356..." #indeed 3822356 + 256 = 3822612 (the size of the firmware file)
cfe="33 32 31 37 30 33 31 31 36 38 00 00 36 32 31 37 32 00 00 00 00 00" = "32170311..62172....." # this starts to be tricky ...
## 62172 is clearly the cfe size, but the cfe itself is slightly different from the files provided in the WL-600g GPL package.
rootfs="33 32 68 31 37 30 39 36 39 36 30 00 00 33 31 33 37 35 33 36 00 00 00" = "3217096960..3137536..." #fs size = 3137536
kernel="33 32 32 30 32 33 34 34 39 36 00 00 36 32 32 36 34 38 00 00 00 00" = "3220234496..622648...." # kernel size = 622648
## 3137536+622648+62172+256=3822612 - all fits so far!
dualimage="00 00"
inactive="00 00"
reserved="00 00 00 00 00 00 00 00 00 00 00 00 00 00 00 00
00 00 00 00 00 00 00 00 00 00 00 00 00 00 00 00
00 00 00 00 00 00 00 00 00 00 00 00 00 00 00 00
00 00 00 00 00 00 00 00 00 00 00 00 00 00 00 00
00 00 00 00 00 00 00 00 00 00"
imagecrc="c9 ea a8 50"
reserved2=""

The reserved2 part is different from WL-600g - after some experimentation, I found out that the first four bytes are CRC of the fs image and the second four bytes are CRC of the kernel, but was not able to figure out the CRC algorithm.
to extract cfe:
dd bs=1 if=JOYCE_IAD_U2_B_306063520_cfe_fs_kernel of=cfe skip=256 count=62172
to extract fs:
dd bs=1 if=JOYCE_IAD_U2_B_306063520_cfe_fs_kernel of=fs skip=62428 count=3137536
to extract kernel:
dd bs=1 if=JOYCE_IAD_U2_B_306063520_cfe_fs_kernel of=kernel skip=3199964 count=622648

By calling the Asus' bcmImageBuilder command on the extracted files, I got a firmware identical (verified with md5sum) to the original:
../../Dokumenty/GPL_AM604G_ForRussia/GENERIC_6348_WLAN_A34_3-06-02-01/hostTools/bcmImageBuilder --output bcmimage --chip 6348 --board 96348GW-11 --blocksize 64 --cfefile cfe --rootfsfile fs --kernelfile kernel --include-cfe

So, let's proceed further...
$ file fs
fs: Squashfs filesystem, big endian, version 2.0, 3136535 bytes, 423 inodes, blocksize: 65536 bytes, created: Mon May 28 08:35:59 2007

the file command confirms the fs file is indeed a squashfs image. Let's extract it:
$ unsquashfs -s fs
Reading a different endian SQUASHFS filesystem on fs
Can't find a SQUASHFS superblock on fs

This is already reported in Ubuntu, I reported it to the Mandriva guys as well.
The hand-compiled squashfs 3.3 seemed to work just fine, but it was not able to deal with the Broadcom specific lzma compression. I tried to mount the fs file on the router, but unfortunately mount was not compiled with support for mounting loop devices
# mount -o ro -o loop /var/usb/usb_2/fs /var/usb/a
mount: Mounting /var/usb/usb_2/fs on /var/usb/a failed: Block device required

After some retries I found out about the excellent OpenBox4 people hacking another Broadcom based ADSL router. They developed nb4-unsquash - a tool to extract the content of Broadcom-lzma-compressed squashfs.


But I still did not trust it entirely. I found out I can mount the internal flash and that's enough for me.
First I made a backup of the original fs:
# mkdir /var/usb/a
# mount -o ro /dev/mtdblock0 /var/usb/a
# /var/usb/usb_1/bin/tar cvf /var/usb/usb_2/firmwarefs.tar /var/usb/a/

Copied the filesystem to my PC:
on-my-PC $ mkdir /tmp/fs
on-my-PC $ netcat -l -p 9000 | dd of=/tmp/fs/fs.tar
on-router# /var/usb/usb_1/bin/dd if=/var/usb/usb_2/firmwarefs.tar |/var/usb/usb_1/bin/mipsel-linux-netcat 192.168.1.64 9000

Unpacked (as root because the contents are special files):
$ su
# cd /tmp/fs
# tar xvf fs.tar

Before doing any modifications I tried recreating the squashfs image:
# /home/hajma/Dokumenty/GPL_AM604G_ForRussia/GENERIC_6348_WLAN_A34_3-06-02-01/hostTools/mksquashfs /tmp/fs/var/usb/a rootfs.img -noappend -be -lzma -no-fragments -noI

and verified with the nb4-unsquash that it looks similar to the original one:
# nb4-unsquash -d new rootfs.img
# nb4-unsquash -d old /tmp/joycefs
# ls -laR old/ > /tmp/oldfslist
# ls -laR new/ > /tmp/newfslist
# kdiff3 /tmp/oldfslist /tmp/newfslist

I saw that all except some modification times was identical, so I put the recreated fs together with the old kernel and cfe:
# /home/hajma/Dokumenty/GPL_AM604G_ForRussia/GENERIC_6348_WLAN_A34_3-06-02-01/hostTools/bcmImageBuilder --output bcmimage --chip 6348 --board 96348GW-11 --blocksize 64 --cfefile cfe --rootfsfile rootfs.img --kernelfile kernel --include-cfe

Then I took a deep breath and flashed the router with the recreated firmware ... ... ... ... ... ...
And it worked!

Unfortunately it was not possible to simply find a place in the boot sequence where everything is already done and flash is mounted. The /etc/profile, launched by the line ::respawn:-/bin/sh of /etc/inittab, calls /bin/cfm, which takes care of all the ADSL settings and mounting the flash - but it stays loaded and the script does not go on. So after several retries I found a solution - added another line to the /etc/inittab:

$ diff -u inittab.old inittab
--- inittab.old 2008-07-03 00:31:44.000000000 +0200
+++ inittab     2008-07-03 00:31:52.000000000 +0200
@@ -1,5 +1,6 @@
+::respawn:-/bin/myscript.sh
tty2::askfirst:-/bin/sh

that will launch a script that waits until the flash drive is mounted and then passes the command to script residing on the flash:
$ cat bin/myscript.sh
#!/bin/sh
while [ "`echo /var/usb/usb_*`" = "/var/usb/usb_*" ]; do
ping 127.0.0.1 # the shell does not have the sleep builtin, hence using ping as a substitute
done
ping -c 20 127.0.0.1 # wait 20 seconds after the usb is mounted just to be sure load is not too high
/bin/sh /var/usb/usb_2/myscript.sh > /var/usb/usb_2/myscript.log 2>&1

Then I created the new image:
# /home/hajma/Dokumenty/GPL_AM604G_ForRussia/GENERIC_6348_WLAN_A34_3-06-02-01/hostTools/mksquashfs /tmp/fs/var/usb/a rootfs.img -noappend -be -lzma -no-fragments -noI

Combined with the rest of the lot:
# /home/hajma/Dokumenty/GPL_AM604G_ForRussia/GENERIC_6348_WLAN_A34_3-06-02-01/hostTools/bcmImageBuilder --output bcmimage --chip 6348 --board 96348GW-11 --blocksize 64 --cfefile cfe --rootfsfile rootfs.img --kernelfile kernel --include-cfe


and flashed. Works like a charm. I put the firmware to the OpenWRT page on AM-200g. direct link


In the next part I'll try to fix the dhcp.


FYI, this is the content of the /var/usb/usb_2/myscript.sh file, launching the jabber daemon:

#!/bin/sh
/bin/iptables -I INPUT -p tcp -i ppp_8_48_1 --dport 5222 -m state --state NEW -j ACCEPT
/bin/iptables -I INPUT -p tcp -i ppp_8_48_1 --dport 5223 -m state --state NEW -j ACCEPT
/bin/iptables -I INPUT -p tcp -i ppp_8_48_1 --dport 5269 -m state --state NEW -j ACCEPT
/var/usb/usb_1/bin/jabberd -c /var/usb/usb_2/jabberd/jabber.xml

FYI, the steps to cross-compile netcat and coreutils (for the tar and dd commands):
$ wget ftp://heanet.dl.sourceforge.net/n/ne/netcat/netcat-0.7.1.tar.bz2
$ tar xvf netcat-0.7.1.tar.bz2
$ cd netcat-0.7.1
$ ./configure --build=i686-pc-linux-gnu --host=mipsel-linux --target=mipsel-linux --prefix=/var/usb/usb_1
$ make
$ make install
$ cd ..
$ wget http://ftp.gnu.org/gnu/coreutils/coreutils-6.9.tar.bz2
$ tar xvf coreutils-6.9.tar.bz2
$ cd coreutils-6.9
$ ./configure --build=i686-pc-linux-gnu --host=mipsel-linux --target=mipsel-linux --prefix=/var/usb/usb_1
$ make
$ make install

Customizing Asus AM200g - IV. jabberd configuration

Customizing Asus AM200g - III. jabberd and vim

Customizing Asus AM200g - II. Preparing the environment

Customizing Asus AM200g - I. PREPARATION

Saturday, June 28, 2008

Customizing Asus AM200g - IV. jabberd configuration

The following is a sequence of trial and errors, one by one, covering the path from the default config file to a working one. It is intended to be a search engine trap for people trying to resolve configuration problems.


$ telnet 192.168.1.1
Trying 192.168.1.1...
Connected to r (192.168.1.1).
Escape character is '^]'.
BCM96348 ADSL Router
Login: admin
Password:
> sh
BusyBox v1.00 (2005.04.12-18:11+0000) Built-in shell (msh)
Enter 'help' for a list of built-in commands.
# /var/usb/usb_1/bin/jabberd
Not writing pidfile /var/usb/usb_1/var/run/jabberd/jabber.pid: Read-only file system

In my setup, the jabberd ecosystem resides on a readonly filesystem, so the very first thing to do is to copy the etc/jabber.xml file to the vfat partition and make sure the files that need to be dynamically created/modified are there as well.

# mkdir /var/usb/usb_2/jabberd
# cp /var/usb/usb_1/etc/jabber.xml /var/usb/usb_2/jabberd
# /var/usb/usb_1/bin/vim /var/usb/usb_2/jabberd/jabber.xml


If you're not familiar with vi, here's quick help:

To quit without saving type ':q' (colon q Enter)

To save changes and quit type ':wq' (colon w q Enter)

To move around use the arrow keys

To start writing at cursor press 'i'

To get out of the writing mode (so that you can move somewhere else) press 'Esc'

To delete character at cursor press 'x'


The changes I did at first were:


1.

To prevent the message


Not writing pidfile /var/usb/usb_1/var/run/jabberd/jabber.pid: Read-only file system

I changed /var/usb/usb_1/var/run/jabberd/jabber.pid to /var/usb/usb_2/jabberd/jabber.pid.

2.


Next I launched jabberd in debug mode (-D) and pointed it to the alternate config file (-c path/to/file):


# /var/usb/usb_1/bin/jabberd -D -c /var/usb/usb_2/jabberd/jabber.xml
Mon Jan  3 20:31:13 2000  mio_tls.cc:921 MIO TLS init (GNU TLS)
Mon Jan  3 20:31:14 2000  log.cc:221 <log xmlns='jabber:server' type='warn' from='-internal'>
Cannot open /var/usb/usb_1/etc/dhparams.pem for reading dhparams: No such file or directory</log>
...

The comments in the file say:
<!-- With the <dhparams/> element right inside the <tls/> element,  -->
<!-- you can configure a file containing parameters for Diffie      -->
<!-- Hellmann key exchanges. If this configuration setting is not   -->
<!-- present, jabberd14 will generated these parameters             -->
<!-- automatically on each startup. This takes some time, therefore -->
<!-- you get a faster startup, if this setting is present.          -->

So I commented out <dhparams type='pem'>/var/usb/usb_1/etc/dhparams.pem</dhparams> as I don't know how to make it properly and don't mind waiting a few seconds more at startup. To start a comment, you write "<!--", you close it with "-->".

3.

# /var/usb/usb_1/bin/jabberd -D -c /var/usb/usb_2/jabberd/jabber.xml
...
Mon Jan  3 20:47:02 2000  xdb_sql.cc:911 using the following query on SQL connection establishment: SET NAMES utf8
Mon Jan  3 20:47:02 2000  log.cc:221 <log xmlns='jabber:server' type='alert' from='xdbsql.localhost'>Your xdb_sql is compiled without support
for the selected database driver 'mysql'.</log>
Mon Jan  3 20:47:02 2000  xdb_sql.cc:813 processing handler definition: <handler xmlns='jabber:config:xdb_sql' ns='jabber:iq:last'>
...
Mon Jan  3 20:47:03 2000  deliver.cc:837 delivering to instance 'elogger.localhost'
Mon Jan  3 20:47:03 2000  deliver.cc:614 DELIVER 3:xdbsql.localhost <log xmlns='jabber:server' type='alert' from='xdbsql.localhost'>Your
xdb_sql is compiled without support for the selected database driver 'mysql'.</log>


Yes, this is true, the daemon was compiled without any sql support. I've followed the steps in README.filespool to setup jabber to store data in files - I definitely don't want to run sql server on the machine. Of course I replaced the <xdb_file>$PREFIX/lib/libjabberdxdbfile.so</xdb_file> with <xdb_file>/var/usb/usb_1/lib/libjabberdxdbfile.so</xdb_file>, and <spool><jabberd:cmdline flag='s'>$PREFIX/var/spool/jabberd</jabberd:cmdline></spool> with <spool><jabberd:cmdline flag='s'>/var/usb/usb_2/jabberd/jabberdspool</jabberd:cmdline></spool> - then made sure the directory exists:
# mkdir /var/usb/usb_2/jabberd/jabberdspool


4.


# /var/usb/usb_1/bin/jabberd -D -c /var/usb/usb_2/jabberd/jabber.xml
...
Mon Jan  3 21:17:58 2000  log.cc:221 <log xmlns='jabber:server' type='alert' from='inject.localhost'>
could not open directory /var/usb/usb_1/var/spool/jabberd/inject.localhost for reading</log>
...

inject.localhost is a directory, where some other process can put messages. jabberd then automatically sends them. To make it working I changed
<in>/var/usb/usb_1/var/spool/jabberd/inject.localhost</in> to <in>/var/usb/usb_2/jabberd/inject.localhost</in> and created the directory with
# mkdir /var/usb/usb_2/jabberd/inject

5.
# /var/usb/usb_1/bin/jabberd -D -c /var/usb/usb_2/jabberd/jabber.xml
...
Mon Jan  3 21:33:15 2000  jabberd.cc:336 main load check of 1.00 with 4 total threads
Mon Jan  3 21:33:16 2000  users.cc:209 0        total users
Mon Jan  3 21:33:17 2000  dialback.cc:1207 dialback idle check

hmm, seems to be working ..., time to launch kopete and try registering a user hajma@192.168.1.1. It failed, of course. The message I got from Kopete was definitely not helpful: "There was an error in the protocol stream: There was a conflict in the information received." and "Unable to create account on the server. The Jabber ID is probably already in use.". What a nonsense ... a brief look into the konsole shows the infamous "bouncing a routed packet" message:
Mon Jan  3 21:35:40 2000  deliver.cc:614 DELIVER 4:192.168.1.1 <route xmlns='jabber:server' type='auth'
to='hajma@192.168.1.1' from='14@c2s/100E0278'><iq type='set' to='192.168.1.1' id='aab0a'>
<query xmlns='jabber:iq:register'>
<username>hajma</username>
<password>qwertyuiop</password>
</query>
</iq></route>
Mon Jan  3 21:35:40 2000  deliver.cc:837 delivering to instance 'dnsrv.localhost'
Mon Jan  3 21:35:40 2000  deliver.cc:766 delivery failed (Internal Delivery Error)
Mon Jan  3 21:35:40 2000  log.cc:221 <log xmlns='jabber:server' type='notice' from='192.168.1.1'>bouncing a routed
packet to hajma@192.168.1.1 from 14@c2s/100E0278: Internal Delivery Error</log>

In short, to make jabberd working correctly, you have to replace all occurences of 'localhost' by the domain or IP jabberd is listening at. Now I replaced localhost with 192.168.1.1.

6.

# /var/usb/usb_1/bin/jabberd -D -c /var/usb/usb_2/jabberd/jabber.xml
...

Registering with Kopete again ... This time I only got one error: "Unable to create account on the server. The Jabber ID is probably already in use.". And again it was completely unrelated - in the konsole I found this:
Mon Jan  3 21:50:02 2000  mod_register.cc:278 we got a reply for: username
Mon Jan  3 21:50:02 2000  mod_register.cc:278 we got a reply for: password
Mon Jan  3 21:50:03 2000  mod_register.cc:298 returned err msg: Missing data field: name
...
<error code='400' type='modify'><bad-request xmlns='urn:ietf:params:xml:ns:xmpp-stanzas'/>
<text xmlns='urn:ietf:params:xml:ns:xmpp-stanzas'>Missing data field: name</text></error></iq></route>

The stupid thing Kopete completely ignores XEP-0077, does not ask the server what is needed for registration and just sends username and password. To support Kopete, I had to delete
<name/> and <email/> from the <register xmlns="jabber:iq:register" notify="yes"> section.


After this change I am able to register a new user and send messages.
Just to be perfect I also changed /var/usb/usb_1/var/log/jabberd/error.log to /var/usb/usb_2/jabberd/error.log.
Off to the next level!

7.


To have it available from outside world, I replaced 192.168.1.1 with my_domain.cz.
To open a port in the AM-200g router, issue the following command:

iptables -I INPUT -p tcp -i ppp_8_48_1 --dport 5222 -m state --state NEW -j ACCEPT


8.

The main reason for running own jabber server is more privacy and that is impossible without encryption - let's do it.
To be able to use TLS I had to generate a self-signed certificate. I've used the procedure described at http://www.vanemery.com/Linux/Jabber/jabberd.html:

$ openssl req -new -x509 -newkey rsa:1024 -days 3650 -keyout privkey.pem -out key.pem

Generating a 1024 bit RSA private key

...........++++++

.........++++++

writing new private key to 'privkey.pem'

Enter PEM pass phrase:

Verifying - Enter PEM pass phrase:

Tuesday, June 17, 2008

Customizing Asus AM200g - III. jabberd and vim


It took me some time to actually make the jabber server working, few people seem to really care about cross-compiling their stuff, but I succeeded and here's the howto:


0. Errata


First of all, during the testing I found out I have to modify the environment settings - the static build of jabber did not work at all. I also added the location of newly compiled libs and headers so that they can be used by programs that depend on them. Some programs were in C++, so the CXX variable had to be set as well. Here's the final environment (P.S. in the end it seems some additions like CPPFLAGS would be needed for perfection, but I'm not in the mood of retrying):


$ cat environment
TOOLCHAINS_HOME=/opt/toolchains/uclibc-crosstools
export LIBS="-L${TOOLCHAINS_HOME}/lib/gcc/mips-linux/3.4.2 \
-L/var/usb/usb_1/lib \
"
export INCLUDES="-I${TOOLCHAINS_HOME}/include/c++/3.4.2 \
-I${TOOLCHAINS_HOME}/mips-linux/sys-include \
-I/var/usb/usb_1/include \
-I/home/hajma/Documents/GPL_AM604G_ForRussia/GENERIC_6348_WLAN_A34_3-06-02-01/kernel/linux/include \
-I/var/usb/usb_1/include/ncurses \
"
#export CFLAGS="${INCLUDES} ${LIBS} -static"
#export LDFLAGS="-static"
export CFLAGS="${INCLUDES} ${LIBS}"
export LDFLAGS=""
export CC="${TOOLCHAINS_HOME}/bin/mipsel-uclibc-gcc"
export CXX="${TOOLCHAINS_HOME}/bin/mipsel-uclibc-g++"
export LD_LIBRARY_PATH=${LD_LIBRARY_PATH}:${TOOLCHAINS_HOME}/lib
export PATH="${TOOLCHAINS_HOME}/bin:${PATH}"

Let's use it:

. environment


Also the symlinking of the uclibc toolchain needed to be further enhanced for some package to get built:

# cd /opt/toolchains/uclibc-crosstools/bin
# for A in mips-linux-uclibc-* ; do
> ln -s ${A} mipsel-linux-${A#mips-linux-uclibc-}
> done

1a. jabberd

$ cd GENERIC_6348_WLAN_A34_3-06-02-01/userapps/opensource
$ wget http://download.jabberd.org/jabberd14/jabberd14-1.6.1.1.tar.gz
$ tar xvf jabberd14-1.6.1.1.tar.gz
$ cd jabberd14-1.6.1.1
$./configure --build=i686-pc-linux-gnu --host=mipsel-linux --target=mipsel-linux --prefix=/var/usb/usb_1

This ends badly:
...
checking for libpopt... configure: error: no


Apparently the library for parsing command line parameters is needed. This was reported a year ago ...


2. popt

$ cd GENERIC_6348_WLAN_A34_3-06-02-01/userapps/opensource
$ wget http://freshmeat.net/redir/popt/72854/url_tgz/popt-1.14.tar.gz
$ tar xvf popt-1.14.tar.gz
$ cd popt-1.14
$ ./configure --build=i686-pc-linux-gnu --host=mipsel-linux --target=mipsel-linux --prefix=/var/usb/usb_1
...
checking for va_copy() function... configure: error: cannot run test program while cross compiling
See `config.log' for more details.

WTF! There's bug 25 about it that the developers closed, saying "va_copy is no longer needed or used in popt-1.14.". Hell, when it's not needed, why did you keep the check ... :-(

I added a comment to the bug and sucessfully run:
$ ./configure --build=i686-pc-linux-gnu --host=mipsel-linux --target=mipsel-linux --prefix=/var/usb/usb_1 ac_cv_va_copy=no
$ make
$ make install

1b. jabberd

Retry:
$ cd ../jabberd14-1.6.1.1
$ ./configure --build=i686-pc-linux-gnu --host=mipsel-linux --target=mipsel-linux --prefix=/var/usb/usb_1
...
checking for libpopt... configure: error: no

The previous step did not help much ... The configure script does not search for the popt.h in the provided directories - again something reported a year ago. It forced me to rise bug 93.

Retry:

$ CPPFLAGS="-I/var/usb/usb_1/include" ./configure --build=i686-pc-linux-gnu --host=mipsel-linux --target=mipsel-linux --prefix=/var/usb/usb_1
...
checking for GNUTLS... no
No package 'gnutls' found
configure: error: Couldn't find required GnuTLS installation

Fine, let's get GnuTLS working first. Furthermore, ./configure --help reveals that some more libraries are needed by jabberd:
--with-libidn=DIR       Where to find libidn (required)
--with-libpth=DIR       Where to find libpth (required)
--with-expat=DIR        Where to find libexpat (required)


In addition GnuTLS requires some other libraries, libtasn1 and libgcrypt, so let's get them all first.


3. GNU Portable Threads
$ cd ..
$ wget ftp://ftp.gnu.org/gnu/pth/pth-2.0.7.tar.gz
$ tar xvf pth-2.0.7.tar.gz
$ cd pth-2.0.7
$ ./configure --build=i686-pc-linux-gnu --host=mipsel-linux --target=mipsel-linux --prefix=/var/usb/usb_1
$ make
$ make install

4. Expat XML Parser
$ cd ..
$ wget http://downloads.sourceforge.net/expat/expat-2.0.1.tar.gz?modtime=1181083143&big_mirror=0
$ tar xvf expat-2.0.1.tar.gz
$ cd expat-2.0.1
$ ./configure --build=i686-pc-linux-gnu --host=mipsel-linux --target=mipsel-linux --prefix=/var/usb/usb_1
$ make
$ make install

5. GNU IDN Library - Libidn
$ cd ..
$ wget ftp://alpha.gnu.org/pub/gnu/libidn/libidn-1.8.tar.gz
$ tar xvf libidn-1.8.tar.gz
$ cd libidn-1.8
$ ./configure --build=i686-pc-linux-gnu --host=mipsel-linux --target=mipsel-linux --prefix=/var/usb/usb_1
$ make
$ make install

6. Tiny ASN.1 library - Libtasn1
$ cd ..
$ wget http://josefsson.org/gnutls/releases/libtasn1/libtasn1-1.4.tar.gz
$ tar xvf libtasn1-1.4.tar.gz
$ cd libtasn1-1.4
$ ./configure --build=i686-pc-linux-gnu --host=mipsel-linux --target=mipsel-linux --prefix=/var/usb/usb_1
$ make
$ make install

To save me from
checking for gpg-error-config... no
checking for GPG Error - version >= 1.4... no
configure: error: libgpg-error is needed.
See ftp://ftp.gnupg.org/gcrypt/libgpg-error/ .


when configuring libgcrypt, libgpg-error has to be done in advance.


7. libgpg-error
$ cd ..
$ wget ftp://ftp.gnupg.org/gcrypt/libgpg-error/libgpg-error-1.6.tar.bz2
$ tar xvf libgpg-error-1.6.tar.bz2
$ cd libgpg-error-1.6
$ ./configure --build=i686-pc-linux-gnu --host=mipsel-linux --target=mipsel-linux --prefix=/var/usb/usb_1
$ make
$ make install

8. libgcrypt
$ cd ..
$ wget ftp://ftp.gnupg.org/gcrypt/libgcrypt/libgcrypt-1.4.1.tar.gz
$ tar xvf libgcrypt-1.4.1.tar.gz
$ cd libgcrypt-1.4.1

The path to libggpg-error has to be specified explicitly:
$ ./configure --build=i686-pc-linux-gnu --host=mipsel-linux --target=mipsel-linux --prefix=/var/usb/usb_1 --with-gpg-error-prefix=/var/usb/usb_1 --with-pth-prefix=/var/usb/usb_1

But it still does not help!:
$ make
...
/opt/toolchains/uclibc-crosstools/bin/mipsel-uclibc-gcc -I/var/usb/usb_1/include -I/opt/toolchains/uclibc-crosstools/include/c++/3.4.2 -I/opt/toolchains/uclibc-crosstools/mips-linux/sys-include -I/var/usb/usb_1/include -I/home/hajma/Documents/GPL_AM604G_ForRussia/GENERIC_6348_WLAN_A34_3-06-02-01/kernel/linux/include -I/var/usb/usb_1/include/ncurses -Wall -Wpointer-arith -o .libs/version version.o  -L/opt/toolchains/uclibc-crosstools/lib/gcc/mips-linux/3.4.2 -L/var/usb/usb_1/lib ../src/.libs/libgcrypt.so -Wl,--rpath -Wl,/var/usb/usb_1/lib
/opt/toolchains/uclibc-crosstools_gcc-3.4.2_uclibc-20050502/bin/../lib/gcc/mips-linux-uclibc/3.4.2/../../../../mips-linux-uclibc/bin/ld: warning: libgpg-error.so.0, needed by ../src/.libs/libgcrypt.so, not found (try using -rpath or -rpath-link)
../src/.libs/libgcrypt.so: undefined reference to `gpg_err_code_from_syserror'
../src/.libs/libgcrypt.so: undefined reference to `gpg_err_code_from_errno'
../src/.libs/libgcrypt.so: undefined reference to `gpg_strerror'
../src/.libs/libgcrypt.so: undefined reference to `gpg_strsource'
collect2: ld returned 1 exit status
make[2]: *** [version] Error 1
make[2]: Leaving directory `/home/hajma/Dokumenty/GPL_AM604G_ForRussia/GENERIC_6348_WLAN_A34_3-06-02-01/userapps/opensource/libgcrypt-1.4.1/tests'
make[1]: *** [all-recursive] Error 1
make[1]: Leaving directory `/home/hajma/Dokumenty/GPL_AM604G_ForRussia/GENERIC_6348_WLAN_A34_3-06-02-01/userapps/opensource/libgcrypt-1.4.1'
make: *** [all] Error 2
$

I found out the guys at OpenWRT had the same problem and have a patch available.
I wanted to file a bug to the GnuPG bug tracker, but did not receive the confirmation mail when registering...
Actually this was told to the author two years ago and he does not care at all.

So here goes the needed modification:
$ diff -u tests/Makefile.in.old tests/Makefile.in
--- tests/Makefile.in.old       2008-06-12 00:01:05.000000000 +0200
+++ tests/Makefile.in   2008-06-12 00:01:11.000000000 +0200
@@ -313,7 +313,7 @@
# a built header.
AM_CPPFLAGS = -I../src -I$(top_srcdir)/src
AM_CFLAGS = $(GPG_ERROR_CFLAGS)
-LDADD = ../src/libgcrypt.la
+LDADD = ../src/libgcrypt.la @LTLIBOBJS@ @GPG_ERROR_LIBS@
# pkbench uses mmap for no good reason.  Needs to be fixed.  Code for
# this can be found in libksba/tests.

and try again:
$ make clean
$ ./configure --build=i686-pc-linux-gnu --host=mipsel-linux --target=mipsel-linux --prefix=/var/usb/usb_1 --with-gpg-error-prefix=/var/usb/usb_1 --with-pth-prefix=/var/usb/usb_1
$ make
$ make install

9. The GNU Transport Layer Security Library
$ cd ..
$ wget ftp://ftp.gnutls.org/pub/gnutls/gnutls-2.2.5.tar.bz2
$ tar xvf gnutls-2.2.5.tar.bz2
$ cd gnutls-2.2.5

To prevent a configure error
checking for libgcrypt-config... no
checking for LIBGCRYPT - version >= 1.2.4... no
configure: error:
***
*** libgcrypt was not found. You may want to get it from
*** ftp://ftp.gnupg.org/gcrypt/libgcrypt/
***

the prefix to libgcrypt has to be specified (and libtasn1 too, to avoid using the built-in one):
$ ./configure --build=i686-pc-linux-gnu --host=mipsel-linux --target=mipsel-linux --prefix=/var/usb/usb_1 --with-libgcrypt-prefix=/var/usb/usb_1 --with-libtasn1-prefix=/var/usb/usb_1

but it still does not work:
$ make
...
/opt/toolchains/uclibc-crosstools/bin/mipsel-uclibc-gcc -std=gnu99 -I/opt/toolchains/uclibc-crosstools/include/c++/3.4.2 -I/opt/toolchains/uclibc-crosstools/mips-linux/sys-include -I/var/usb/usb_1/include -I/home/hajma/Documents/GPL_AM604G_ForRussia/GENERIC_6348_WLAN_A34_3-06-02-01/kernel/linux/include -I/var/usb/usb_1/include/ncurses -D_REENTRANT -D_THREAD_SAFE -pipe -I/var/usb/usb_1/include -I/opt/toolchains/uclibc-crosstools/include/c++/3.4.2 -I/opt/toolchains/uclibc-crosstools/mips-linux/sys-include -I/var/usb/usb_1/include -I/home/hajma/Documents/GPL_AM604G_ForRussia/GENERIC_6348_WLAN_A34_3-06-02-01/kernel/linux/include -I/var/usb/usb_1/include/ncurses -D_REENTRANT -D_THREAD_SAFE -o ex-cert-select ex-cert-select.o  -L/opt/toolchains/uclibc-crosstools/lib/gcc/mips-linux/3.4.2 -L/var/usb/usb_1/lib ./.libs/libexamples.a ../../gl/.libs/libgnu.a /var/usb/usb_1/lib/libgcrypt.so /var/usb/usb_1/lib/libgpg-error.so ../../lib/.libs/libgnutls.so ../../libextra/.libs/libgnutls-extra.so  -Wl,--rpath -Wl,/var/usb/usb_1/lib -Wl,--rpath -Wl,/home/hajma/Dokumenty/GPL_AM604G_ForRussia/GENERIC_6348_WLAN_A34_3-06-02-01/userapps/opensource/gnutls-2.2.5/lib/.libs -Wl,--rpath -Wl,/home/hajma/Dokumenty/GPL_AM604G_ForRussia/GENERIC_6348_WLAN_A34_3-06-02-01/userapps/opensource/gnutls-2.2.5/libextra/.libs -Wl,--rpath -Wl,/var/usb/usb_1/lib
/opt/toolchains/uclibc-crosstools_gcc-3.4.2_uclibc-20050502/bin/../lib/gcc/mips-linux-uclibc/3.4.2/../../../../mips-linux-uclibc/bin/ld: warning: libtasn1.so.3, needed by ../../lib/.libs/libgnutls.so, not found (try using -rpath or -rpath-link)
../../lib/.libs/libgnutls.so: undefined reference to `asn1_write_value@LIBTASN1_0_3'
../../lib/.libs/libgnutls.so: undefined reference to `asn1_delete_structure@LIBTASN1_0_3'
../../lib/.libs/libgnutls.so: undefined reference to `asn1_get_length_der@LIBTASN1_0_3'
../../lib/.libs/libgnutls.so: undefined reference to `asn1_get_tag_der@LIBTASN1_0_3'
../../lib/.libs/libgnutls.so: undefined reference to `asn1_der_decoding_startEnd@LIBTASN1_0_3'
../../lib/.libs/libgnutls.so: undefined reference to `asn1_der_decoding@LIBTASN1_0_3'
../../lib/.libs/libgnutls.so: undefined reference to `asn1_create_element@LIBTASN1_0_3'
../../lib/.libs/libgnutls.so: undefined reference to `asn1_copy_node@LIBTASN1_0_3'
../../lib/.libs/libgnutls.so: undefined reference to `asn1_read_value@LIBTASN1_0_3'
../../lib/.libs/libgnutls.so: undefined reference to `asn1_number_of_elements@LIBTASN1_0_3'
../../lib/.libs/libgnutls.so: undefined reference to `asn1_array2tree@LIBTASN1_0_3'
../../lib/.libs/libgnutls.so: undefined reference to `asn1_check_version@LIBTASN1_0_3'
../../lib/.libs/libgnutls.so: undefined reference to `asn1_find_node@LIBTASN1_0_3'
../../lib/.libs/libgnutls.so: undefined reference to `asn1_find_structure_from_oid@LIBTASN1_0_3'
../../lib/.libs/libgnutls.so: undefined reference to `asn1_der_coding@LIBTASN1_0_3'
collect2: ld returned 1 exit status
make[4]: *** [ex-cert-select] Error 1
make[4]: Leaving directory `/home/hajma/Dokumenty/GPL_AM604G_ForRussia/GENERIC_6348_WLAN_A34_3-06-02-01/userapps/opensource/gnutls-2.2.5/doc/examples'
make[3]: *** [all-recursive] Error 1
make[3]: Leaving directory `/home/hajma/Dokumenty/GPL_AM604G_ForRussia/GENERIC_6348_WLAN_A34_3-06-02-01/userapps/opensource/gnutls-2.2.5/doc'
make[2]: *** [all] Error 2
make[2]: Leaving directory `/home/hajma/Dokumenty/GPL_AM604G_ForRussia/GENERIC_6348_WLAN_A34_3-06-02-01/userapps/opensource/gnutls-2.2.5/doc'
make[1]: *** [all-recursive] Error 1
make[1]: Leaving directory `/home/hajma/Dokumenty/GPL_AM604G_ForRussia/GENERIC_6348_WLAN_A34_3-06-02-01/userapps/opensource/gnutls-2.2.5'
make: *** [all] Error 2

After some experimentation (I told you I am no programmer) I found the following to work:
$ LIBS="-ltasn1 $LIBS" ./configure --build=i686-pc-linux-gnu --host=mipsel-linux --target=mipsel-linux --prefix=/var/usb/usb_1 --with-libgcrypt-prefix=/var/usb/usb_1 --with-libtasn1-prefix=/var/usb/usb_1
$ make
$ make install


Also I found that the two official mirrors have both different directory structure, so I was missing the devel branch of GnuTLS. The above works with http://www.gnu.org/software/gnutls/releases/gnutls-2.3.14.tar.bz2 (and breaks with 2.2.5).


1c. jabberd

Let's not try to find more bugs and specify the needed components to the configure script now:
$ cd ../jabberd14-1.6.1.1
$ CPPFLAGS="-I/var/usb/usb_1/include" ./configure --build=i686-pc-linux-gnu --host=mipsel-linux --target=mipsel-linux --prefix=/var/usb/usb_1 --with-libidn=/var/usb/usb_1 --with-libpth=/var/usb/usb_1 --with-expat=/var/usb/usb_1

but still bad luck:
checking for GnuTLS... checking for mipsel-linux-pkg-config... no
checking for pkg-config... /usr/bin/pkg-config
configure: WARNING: In the future, Autoconf will not detect cross-tools
whose name does not start with the host triplet.  If you think this
configuration is useful to you, please write to autoconf@gnu.org.
checking pkg-config is at least version 0.9.0... yes
checking for GNUTLS... no
No package 'gnutls' found
configure: error: Couldn't find required GnuTLS installation

And again, reported a year ago.
We can fix that, but the show is still not at the end:
$ PKG_CONFIG_PATH=/var/usb/usb_1/lib/pkgconfig CPPFLAGS="-I/var/usb/usb_1/include" ./configure --build=i686-pc-linux-gnu --host=mipsel-linux --target=mipsel-linux --prefix=/var/usb/usb_1 --with-libidn=/var/usb/usb_1 --with-libpth=/var/usb/usb_1 --with-expat=/var/usb/usb_1
...
checking for GnuTLS... checking for mipsel-linux-pkg-config... no
checking for pkg-config... /usr/bin/pkg-config
configure: WARNING: In the future, Autoconf will not detect cross-tools
whose name does not start with the host triplet.  If you think this
configuration is useful to you, please write to autoconf@gnu.org.
checking pkg-config is at least version 0.9.0... yes
checking for GNUTLS... yes
checking for TLS 1.2 support in GnuTLS... yes
checking for GNUTLSEXTRA... yes
checking idna.h usability... yes
checking idna.h presence... yes
checking for idna.h... yes
checking for stringprep_check_version in -lidn... no
configure: error: Couldn't find required libidn installation

Quick look into config.log reveals something familiar:
/opt/toolchains/uclibc-crosstools_gcc-3.4.2_uclibc-20050502/bin/../lib/gcc/mips-linux-uclibc/3.4.2/../../../../mips-linux-uclibc/bin/ld: warning: libtasn1.so.3, needed by /var/usb/usb_1/lib/libgnutls-extra.so, not found (try using -rpath or -rpath-link)
/var/usb/usb_1/lib/libgnutls.so: undefined reference to `asn1_write_value@LIBTASN1_0_3'
/var/usb/usb_1/lib/libgnutls.so: undefined reference to `gcry_sexp_release@GCRYPT_1.2'
...

Let's see if the GnuTLS fix works here as well:
LIBS="-ltasn1 $LIBS" PKG_CONFIG_PATH=/var/usb/usb_1/lib/pkgconfig CPPFLAGS="-I/var/usb/usb_1/include" ./configure --build=i686-pc-linux-gnu --host=mipsel-linux --target=mipsel-linux --prefix=/var/usb/usb_1 --with-libidn=/var/usb/usb_1 --with-libpth=/var/usb/usb_1 --with-expat=/var/usb/usb_1
...
checking for stringprep_check_version in -lidn... no

No, it doesn't :-(, but config.log reveals we got one step further:
...
/opt/toolchains/uclibc-crosstools/bin/mipsel-uclibc-g++ -o conftest -g -O2 -I/va
r/usb/usb_1/include -I/var/usb/usb_1/include -I/var/usb/usb_1/include -I/var/usb
/usb_1/include conftest.cpp  -L/var/usb/usb_1/lib /var/usb/usb_1/lib/libgnutls-e
xtra.so /var/usb/usb_1/lib/libgnutls.so /var/usb/usb_1/lib/libidn.so -lresolv /v
ar/usb/usb_1/lib/libtasn1.so -L/opt/toolchains/uclibc-crosstools/lib/gcc/mips-li
nux/3.4.2 -ldl -Wl,--rpath -Wl,/var/usb/usb_1/lib -Wl,--rpath -Wl,/var/usb/usb_1
/lib
/opt/toolchains/uclibc-crosstools_gcc-3.4.2_uclibc-20050502/bin/../lib/gcc/mips-
linux-uclibc/3.4.2/../../../../mips-linux-uclibc/bin/ld: warning: libgcrypt.so.1
1, needed by /var/usb/usb_1/lib/libgnutls-extra.so, not found (try using -rpath
or -rpath-link)
...

Finally, this works:
LIBS="-ltasn1 -lgpg-error -lgcrypt $LIBS" PKG_CONFIG_PATH=/var/usb/usb_1/lib/pkgconfig CPPFLAGS="-I/var/usb/usb_1/include" ./configure --build=i686-pc-linux-gnu --host=mipsel-linux --target=mipsel-linux --prefix=/var/usb/usb_1 --with-libidn=/var/usb/usb_1 --with-libpth=/var/usb/usb_1 --with-expat=/var/usb/usb_1

but make fails:
$ make
...
/var/usb/usb_1/include/gnutls/openpgp.h: In function `void mio_tls_process_credentials(xmlnode_t*, const std::list<std::string, std::allocator<std::string> >&, const std::list<std::string, std::allocator<std::string> >&, gnutls_dh_params_int*, const std::list<std::string, std::allocator<std::string> >&, const std::list<std::string, std::allocator<std::string> >&)':
/var/usb/usb_1/include/gnutls/openpgp.h:247: error: too few arguments to function `int gnutls_certificate_set_openpgp_key_file(gnutls_certificate_credentials_st*, const char*, const char*, gnutls_openpgp_crt_fmt_t)'
mio_tls.cc:615: error: at this point in file
/var/usb/usb_1/include/gnutls/openpgp.h:271: error: too few arguments to function `int gnutls_certificate_set_openpgp_keyring_file(gnutls_certificate_credentials_st*, const char*, gnutls_openpgp_crt_fmt_t)'
mio_tls.cc:634: error: at this point in file
mio_tls.cc:653: error: `gnutls_certificate_set_openpgp_trustdb' undeclared (first use this function)
mio_tls.cc:653: error: (Each undeclared identifier is reported only once for each function it appears in.)
make[3]: *** [mio_tls.lo] Error 1
make[3]: Leaving directory `/home/hajma/Dokumenty/GPL_AM604G_ForRussia/GENERIC_6348_WLAN_A34_3-06-02-01/userapps/opensource/jabberd14-1.6.1.1/jabberd'
make[2]: *** [all-recursive] Error 1
make[2]: Leaving directory `/home/hajma/Dokumenty/GPL_AM604G_ForRussia/GENERIC_6348_WLAN_A34_3-06-02-01/userapps/opensource/jabberd14-1.6.1.1/jabberd'
make[1]: *** [all-recursive] Error 1
make[1]: Leaving directory `/home/hajma/Dokumenty/GPL_AM604G_ForRussia/GENERIC_6348_WLAN_A34_3-06-02-01/userapps/opensource/jabberd14-1.6.1.1'
make: *** [all] Error 2

This turned out to be easy, the Gentoo folks found and patched it couple of months ago (and it looks it is in the jabberd cvs now) and after applying it, the journey ends:
$ make
$ make install


Wow, congratulations!!


Let's get an editor so that we can modify the config files in place:


10a. vim
$ cd ..
$ wget ftp://ftp.vim.org/pub/vim/unix/vim-7.1.tar.bz2
$ tar xvf vim-7.1.tar.bz2
$ cd vim71
$ ./configure --build=i686-pc-linux-gnu --host=mipsel-linux --target=mipsel-linux --prefix=/var/usb/usb_1 --with-features=tiny
...
checking for strip... strip
configure: error: cannot compile a simple program, check CC and CFLAGS
(cross compiling doesn't work)

Would you expect an opensource app as big and widespread as Vim to be so broken? I would now. Fortunately the OpenWRT and FreeWRT people come to help again.
$ wget --no-check-certificate https://dev.openwrt.org/browser/packages/utils/vim/patches/001-cross_compile.patch?format=txt
$ patch -p1 <001-cross_compile.patch\?format\=txt
$ ./configure --build=i686-pc-linux-gnu --host=mipsel-linux --target=mipsel-linux --prefix=/var/usb/usb_1 --with-features=tiny
...
checking --with-tlib argument... empty: automatic terminal library selection
checking for tgetent in -lncurses... no
checking for tgetent in -ltermlib... no
checking for tgetent in -ltermcap... no
checking for tgetent in -lcurses... no
no terminal library found
checking for tgetent()... configure: error: NOT FOUND!
You need to install a terminal library; for example ncurses.
Or specify the name of the library with --with-tlib.

Seems some terminal library is needed ...
11. The Ncurses (new curses) library
$ cd ..
$ wget http://ftp.gnu.org/pub/gnu/ncurses/ncurses-5.6.tar.gz
$ tar xvf ncurses-5.6.tar.gz
$ cd ncurses-5.6
$ ./configure --build=i686-pc-linux-gnu --host=mipsel-linux --target=mipsel-linux --prefix=/var/usb/usb_1
$ make
$ make install

10b. vim
$ cd ../vim71
$ ./configure --build=i686-pc-linux-gnu --host=mipsel-linux --target=mipsel-linux --prefix=/var/usb/usb_1 --with-features=tiny
...
checking for tgetent in -lncurses... yes
ncurses library is not usable
checking for tgetent in -ltermlib... no
checking for tgetent in -ltermcap... no
checking for tgetent in -lcurses... no
no terminal library found
checking for tgetent()... configure: error: NOT FOUND!
You need to install a terminal library; for example ncurses.
Or specify the name of the library with --with-tlib.

seems we have to force it:
$ ./configure --build=i686-pc-linux-gnu --host=mipsel-linux --target=mipsel-linux --prefix=/var/usb/usb_1 --with-features=tiny --with-tlib=ncurses
$ make
...
Starting make in the src directory.
If there are problems, cd to the src directory and run make there
cd src && make first
make[1]: Entering directory `/home/hajma/Dokumenty/GPL_AM604G_ForRussia/GENERIC_6348_WLAN_A34_3-06-02-01/userapps/opensource/vim71/src'
CC="/opt/toolchains/uclibc-crosstools/bin/mipsel-uclibc-gcc -Iproto -DHAVE_CONFIG_H   -I/var/usb/usb_1        " srcdir=. sh ./osdef.sh
osdef0.c:10:44: termcap.h: No such file or directory
...
In file included from term.c:33:
/var/usb/usb_1/include/ncurses/termcap.h:64: error: conflicting types for 'tgoto'
...

hmm, I guess I really need to use the CPPFLAGS, shouldn't I modify the environment file? Perhaps, but now it's too late, it's finished:
$ make distclean
$ CPPFLAGS="-I/var/usb/usb_1/include/ncurses" ./configure --build=i686-pc-linux-gnu --host=mipsel-linux --target=mipsel-linux --prefix=/var/usb/usb_1 --with-features=tiny --with-tlib=ncurses --disable-gui --disable-gtktest --disable-xim --without-x --disable-multibyte --disable-netbeans --disable-cscope --disable-gpm
$ make
$ make install
...
strip /var/usb/usb_1/bin/vim
strip: Unable to recognise the format of the input file `/var/usb/usb_1/bin/vim'
make[1]: *** [installvimbin] Error 1
make[1]: Leaving directory `/home/hajma/Dokumenty/GPL_AM604G_ForRussia/GENERIC_6348_WLAN_A34_3-06-02-01/userapps/opensource/vim71/src'
make: *** [install] Error 2

No, it's not finished... Let's just hack it:
$ diff -u src/Makefile.old src/Makefile
--- src/Makefile.old    2008-06-17 02:16:32.000000000 +0200
+++ src/Makefile        2008-06-17 02:16:47.000000000 +0200
@@ -999,7 +999,7 @@
INSTALL_DATA_R = cp -r
### Program to run on installed binary
-#STRIP = strip
+STRIP = echo
### Permissions for binaries  {{{1
BINMOD = 755
$ make install


I was quite surprised with the size of some files. Performing

/opt/toolchains/uclibc-crosstools/bin/mipsel-linux-sstrip
on bin/ and lib/ helped a bit, but 1MB of vim suggests there's still place for optimizations.


Final creation and writing of the squashfs image:


# /home/hajma/Dokumenty/asus/squashfs2.0r2/squashfs-tools/mksquashfs /var/usb/usb_1 /tmp/new.sqsh -be -noI -noD -noF
# dd if=/tmp/new.sqsh of=/dev/sda1

In the next part I'll try to correctly configure jabberd and make it start at router boot.


Customizing Asus AM200g - V. firmware modification

Customizing Asus AM200g - IV. jabberd configuration

Customizing Asus AM200g - II. Preparing the environment

Customizing Asus AM200g - I. PREPARATION

Monday, June 2, 2008

Customizing Asus AM200g - II. Preparing the environment

I know I promised you a jabber server, but in the end it was not so easy and the entry would be perhaps too long, so let's start with simple stuff :-)


Note I am not a programmer, have no C skills, so there can be a glitch here and there, but in the end all steps below led me to something that worked. If you find something really nasty, please let me know.

I took most of the inspiration at Daniel Fišer's page on Asus WL-600g hacking and just tweaked it to suit my setup.

1. On a fresh Mandriva 2008.1 installation some of the necessary tools are missing. Install them as root:

# urpmi make gcc autoconf automake


2. Since Asus still did not release the sources for AM200g, I used the GPL setup provided for AM604g, which uses the same chipset and seems to be almost identical (it even comes in the same box, except for missing USB port and second antenna). Follow these steps to install it:

$ wget http://dlsvr02.asus.com/pub/ASUS/Broadband/xDSL/GPL_AM604G_ForRussia.zip
$ unzip GPL_AM604G_ForRussia.zip
$ cd GPL_AM604G_ForRussia
$ tar xvf GENERIC_6348_WLAN_A34_3-06-02-01_GPL.tar.gz
$ su
# ./consumer_install

3. Not surprisingly, the AM604g source is just as broken as the AM600g one, so the same steps as described by Daniel need to be done:

# cd /opt/toolchains/uclibc-crosstools/bin
# for A in mips-linux-uclibc-* ; do
> ln -s ${A} mipsel-uclibc-${A#mips-linux-uclibc-}
> done
# cd /home/hajma/Documents/GPL_AM604G_ForRussia/GENERIC_6348_WLAN_A34_3-06-02-01
# wget http://daniel.fiser.cz/IT/asus_WL-600g/cur_menu.patch
# patch -p0 <cur_menu.patch


4. Now you can try to build the firmware, just for fun:

# make PROFILE=GENERIC_6348_WLAN_A34

The firmware is created in the images directory. Since I have no replacement for the router, I'm not going to try it, although it might actually work.

5. To prepare the environment, create a file containing:

$ cat environment
TOOLCHAINS_HOME=/opt/toolchains/uclibc-crosstools
export LIBS="-L${TOOLCHAINS_HOME}/lib/gcc/mips-linux/3.4.2"
export INCLUDES="-I${TOOLCHAINS_HOME}/include/c++/3.4.2 \
-I${TOOLCHAINS_HOME}/mips-linux/sys-include \
-I/home/hajma/Documents/GPL_AM604G_ForRussia/GENERIC_6348_WLAN_A34_3-06-02-01/kernel/linux/include"
export CFLAGS="${INCLUDES} ${LIBS} -static"
export LDFLAGS="-static"
export CC="${TOOLCHAINS_HOME}/bin/mipsel-uclibc-gcc"
export LD_LIBRARY_PATH=${LD_LIBRARY_PATH}:${TOOLCHAINS_HOME}/lib
export PATH="${PATH}:${TOOLCHAINS_HOME}/bin"

and set the environment before doing anything else:
# . ./environment

(yes, this is "dot space dot ...")

6. Let's proceed to the helloworld example. Create it's own folder:

mkdir /home/hajma/Documents/GPL_AM604G_ForRussia/GENERIC_6348_WLAN_A34_3-06-02-01/userapps/opensource/helloworld

and follow the steps described in the automake manual:

Create the following files in an empty directory.

  • src/main.c is the source file for the hello program. We
    store it in the src/ subdirectory, because later, when the package
    evolves, it will ease the addition of a man/ directory for man
    pages, a data/ directory for data files, etc.
    ~/amhello % cat src/main.c
    #include <config.h>
    #include <stdio.h>
    int
    main (void)
    {
    puts ("Hello World!");
    puts ("This is " PACKAGE_STRING ".");
    return 0;
    }
    

  • README contains some very limited documentation for our little
    package.
    ~/amhello % cat README
    This is a demonstration package for GNU Automake.
    Type `info Automake' to read the Automake manual.
    

  • Makefile.am and src/Makefile.am contain Automake
    instructions for these two directories.
    ~/amhello % cat src/Makefile.am
    bin_PROGRAMS = hello
    hello_SOURCES = main.c
    ~/amhello % cat Makefile.am
    SUBDIRS = src
    dist_doc_DATA = README
    

  • Finally, configure.ac contains Autoconf instructions to
    create the configure script.
    ~/amhello % cat configure.ac
    AC_INIT([amhello], [1.0], [bug-automake@gnu.org])
    AM_INIT_AUTOMAKE([-Wall -Werror foreign])
    AC_PROG_CC
    AC_CONFIG_HEADERS([config.h])
    AC_CONFIG_FILES([
    Makefile
    src/Makefile
    ])
    AC_OUTPUT
    

Once you have these five files, it is time to run the Autotools to instantiate the build system. Do this using the autoreconf command as follows:
~/amhello % autoreconf --install
configure.ac: installing `./install-sh'
configure.ac: installing `./missing'
src/Makefile.am: installing `./depcomp'
At this point the build system is complete.
In addition to the three scripts mentioned in its output, you can see that autoreconf created four other files: configure, config.h.in, Makefile.in, and src/Makefile.in. The latter three files are templates that will be adapted to the system by configure under the names config.h, Makefile, and src/Makefile. Let's do this:
In addition to the manual's instructions, the details of host architecture must be provided when compiling for another platform. Also I set the prefix as the flash drive gets mounted as /var/usb/usb_1:
# ./configure --build=i686-pc-linux-gnu --host=mipsel-linux --target=mipsel-linux --prefix=/var/usb/usb_1/hello
# make
# make install
7. Optionally you can strip (remove all unnecessary bits) the binary:
# cd /var/usb/usb_1/hello/bin
# /opt/toolchains/uclibc-crosstools/bin/mipsel-uclibc-strip -o hellostripped hello
8. Copy the files to the flash:
# /home/hajma/Documents/squashfs2.0r2/squashfs-tools/mksquashfs /var/usb/usb_1 /tmp/dir.sqsh -be -noI -noD -noF
# dd if=/tmp/dir.sqsh of=/dev/sdb1
9. Plug the flash drive to the router and verify all runs fine:
$ telnet 192.168.1.1
Trying 192.168.1.1...
Connected to 192.168.1.1 (192.168.1.1).
Escape character is '^]'.
BCM96348 ADSL Router
Login: admin
Password:
> sh
BusyBox v1.00 (2005.04.12-18:11+0000) Built-in shell (msh)
Enter 'help' for a list of built-in commands.
# cd /var/usb/usb_1/hello/bin
# ./hello
Hello World!
This is amhello 1.0.
# ./hellostripped
Hello World!
This is amhello 1.0.
Final note: if you get "hello: applet not found" instead, it means you somehow did not compile the program for correct platform and BusyBox was not able to execute it.
Customizing Asus AM200g - V. firmware modification Customizing Asus AM200g - IV. jabberd configuration Customizing Asus AM200g - III. jabberd and vim Customizing Asus AM200g - I. PREPARATION

Tuesday, May 20, 2008

Customizing Asus AM200g - I. PREPARATION


As a fresh ADSL subscriber I became the owner of Asus AM200g ADSL modem/wireless router. The box is quite powerful - it is run by a 256 MHz processor, has 16 MB of RAM and is running Linux, so I'd like to use it for some other useful tasks. Since Asus has not yet released the source code it's not going to be that easy.


I want to touch the original firmware the least possible, so I'm going to add everything to an attached flash drive.
But the firmware only supports vfat and squashfs! Because of vfat filesystem limitations I decided to use a squashfs partition to store program files and a vfat one to store data that need to be modified, let's see how it works out. Note that all is done using Mandriva Linux 2008.1.


# urpmi squashfs-tools
$ mksquashfs /tmp/directory /tmp/dir.sqsh
Parallel mksquashfs: Using 1 processor
Creating little endian 3.1 filesystem on /tmp/dir.sqsh, block size 131072.
[==============================================================] 6136/6136 100%
Exportable Little endian filesystem, data block size 131072, compressed data, compressed metadata, compressed fragments, duplicates are removed
Filesystem size 4586.44 Kbytes (4.48 Mbytes)
8.61% of uncompressed filesystem size (53255.07 Kbytes)
Inode table size 53222 bytes (51.97 Kbytes)
23.13% of uncompressed inode table size (230058 bytes)
Directory table size 73178 bytes (71.46 Kbytes)
31.71% of uncompressed directory table size (230774 bytes)
Number of duplicate files found 3581
Number of inodes 7327
Number of files 6092
Number of fragments 224
Number of symbolic links  0
Number of device nodes 0
Number of fifo nodes 0
Number of socket nodes 0
Number of directories 1235
Number of uids 1
hajma (500)
Number of gids 0

Now I wrote the created image to the flash drive's first partition:
# dd if=/tmp/dir.sqsh of=/dev/sdb1

Rather surprisingly, the firmware only supports squashfs v2.0, so after plugging the flash to the router, it shows in the logs
kernel: SQUASHFS error: Major/Minor mismatch, filesystem is (3:1), I support (1 : x) or (2 : <= 0)
and in addition squashfs v3 does not support creating v2 images. Oh fsck. So I downloaded squashfs2.0-r2.tar.gz and
# urpmi make
# urpmi zlib1-devel
$ tar -xvf squashfs2.0-r2.tar.gz # note that tar now automatically gunzips the file too!
$ cd squashfs2.0-r2/squashfs-tools/
$ make
cc -I. -D_FILE_OFFSET_BITS=64 -D_LARGEFILE_SOURCE -O2   -c -o mksquashfs.o mksquashfs.c
mksquashfs.c: In function ‘create_inode’:
mksquashfs.c:476: warning: integer constant is too large for ‘long’ type
mksquashfs.c:489: error: lvalue required as left operand of assignment
mksquashfs.c:541: warning: integer constant is too large for ‘long’ type
mksquashfs.c:546: warning: integer constant is too large for ‘long’ type
mksquashfs.c:549: error: lvalue required as left operand of assignment
mksquashfs.c:568: warning: integer constant is too large for ‘long’ type
mksquashfs.c: In function ‘write_file’:
mksquashfs.c:1030: warning: integer constant is too large for ‘long’ type
mksquashfs.c:1096: warning: integer constant is too large for ‘long’ type
mksquashfs.c: In function ‘dir_scan’:
mksquashfs.c:1275: warning: integer constant is too large for ‘long’ type
mksquashfs.c:1352: warning: integer constant is too large for ‘long’ type
make: *** [mksquashfs.o] Error 1
$
hmm, okay, the old crap does not want to be compiled with gcc 4 ...
# urpmi gcc3.3
$ CC=gcc-3.3.6 make
$ ./mksquashfs /tmp/directory /tmp/dir.sqsh
# dd if=/tmp/dir.sqsh of=/dev/sdb1
After plugging it into the router,
kernel: SQUASHFS: Mounting a different endian SQUASHFS filesystem on sda1
shows up in the logs. Okay, time to try
$ ./mksquashfs /tmp/directory /tmp/dir.sqsh -be
# dd if=/tmp/dir.sqsh of=/dev/sdb1
and I am getting one error message less! But I still see an ugly
kernel: SQUASHFS error: lzma_fs error while decompressing!
kernel: SQUASHFS error: Unable to read cache block [4bea97:7ae]
kernel: SQUASHFS error: Unable to read inode [4bea97:7ae]
kernel: SQUASHFS error: Root inode create failed" and it does not get mounted.
Googling reveals three links that do not help much. But since decompression is mentioned ... let's try to turn off compression ... :
$ ./mksquashfs /tmp/opends/src /tmp/dir.sqsh -be -noI -noD -noF
# dd if=/tmp/dir.sqsh of=/dev/sdb1
and voila, it gets mounted!
kernel: usb 1-1: new high speed USB device using address 7
kernel: scsi5 : SCSI emulation for USB Mass Storage devices
kernel: Vendor: USB 2.0 Model: Flash Disk Rev: 0.00
kernel: Type: Direct-Access ANSI SCSI revision: 02
kernel: SCSI device sda: 2047999 512-byte hdwr sectors (1049 MB)
kernel: sda: assuming Write Enabled
kernel: sda: assuming drive cache: write through
kernel: sda1 sda2
kernel: Attached scsi removable disk sda at scsi5, channel 0, id 0, lun 0
kernel: Attached scsi generic sg0 at scsi5, channel 0, id 0, lun 0, type 0
kernel: USB Mass Storage device found at 7
syslog: mkdir -p /var/usb/usb_1
syslog: mount /dev/sda1 /var/usb/usb_1
Next time I'll try to get a jabber server running, time to go sleep now. Customizing Asus AM200g - V. firmware modification Customizing Asus AM200g - IV. jabberd configuration Customizing Asus AM200g - III. jabberd and vim Customizing Asus AM200g - II. Preparing the environment

Sunday, May 18, 2008

Rychlost opravy chyb aneb úpadek Gnome a KDE

Před více než rokem jsem porovnával rychlost opravy chyb, a teď mě napadlo podívat se, jak se od té doby situace změnila.


Metodika zůstala stejná:


Vyberou se chyby z bugzilly za šestiměsíční období (leden-červen 2006 a květen-říjen 2007). Zajímavé jsou jen opravdové chyby, takže nepočítáme duplicity, neplatné chyby a chyby způsobené původním kódem (upstream). Pokud nebyla chyba opravena do 6 měsíců, počítá se jako neopravená.


Oproti původnímu srovnání jsem v Mandriví Bugzille počítal jen položku Mandriva Linux (i když ty ostatní položky měly dohromady jen pár desítek bugů) a v Novellí Bugzille jen položku openSUSE. Vynechal jsem RedHat, anžto jsem nakonec nějak nepochopil, jakým způsobem tu Bugzillu vedou.


A výsledek je na obrázcích.


Mandriva si polepšila, očividně je to důsledek změn, které zavedl Adam Williamson. (Nahlášená chyba je nejprve prozkoumána členy triage teamu, kteří se postarají, aby se nejednalo o duplicitu a aby hlášení obsahovalo všechny potřebné informace. Teprve pak je předána vývojářům, kteří tak neztrácejí čas.)


openSUSE je stabilní, Gentoo si mírně polepšilo.


Ale velké překvapení mě čekalo u KDE a Gnome.

U KDE očividně platilo, že chyba je buďto opravena v den nahlášení anebo nikdy. Teď silně polevili, a to i přes výrazně nižší počet hlášení.


Největší překvapení bylo ale u Gnome. Z 50% úspěšnosti se dostali na 16 %. Musí se ale uznat, že měli trochu těžší situaci - počet hlášení se jim ztrojnásobil a polovina z nich byly duplicity (<flame>tipnul bych si na ubunťáky - je jich hodně, mají Gnome jako default a mají vyšší podíl BFU</flame>) (za duplicity mohou hlavně automatická hlášení při pádu aplikací, hlavně od uživatelů Fedory a Ubuntu)


Data 2006


Data 2007

Data:


Mandriva old
(2006-01-01 - 2006-06-30)
Celkový počet chyb: 2634
Z nich nás ale zajímá jen: 2089
(Protože nepočítáme 215 DUPLICATE, 46 WORKSFORME, 175 INVALID, 74 WONTFIX a 35 REPORTEDUPSTREAM)
Neopraveno zůstalo: 1050
Opraveno bylo: 1039
Celkem bugů opravených do 1 dne: 207
Celkem bugů opravených do 7 dnů: 205
Celkem bugů opravených do 14 dnů: 85
Celkem bugů opravených do 30 dnů: 112
Celkem bugů opravených do 61 dnů: 127
Celkem bugů opravených do 183 dnů: 303
Mandriva new
(2007-05-01 - 2007-10-30)
Celkový počet chyb: 4174
Z nich nás ale zajímá jen: 3128
(Protože nepočítáme 479 DUPLICATE, 54 WORKSFORME, 306 INVALID, 154 WONTFIX a 53 REPORTEDUPSTREAM)
Neopraveno zůstalo: 1278
Opraveno bylo: 1850
Celkem bugů opravených do 1 dne: 334
Celkem bugů opravených do 7 dnů: 456
Celkem bugů opravených do 14 dnů: 201
Celkem bugů opravených do 30 dnů: 237
Celkem bugů opravených do 61 dnů: 192
Celkem bugů opravených do 183 dnů: 430
openSUSE old
Celkový počet chyb: 7005
Z nich nás ale zajímá jen: 4297
(Protože nepočítáme 1093 DUPLICATE, 263 WORKSFORME, 801 INVALID a 551 WONTFIX)
Neopraveno zůstalo: 1525
Opraveno bylo: 2772
Celkem bugů opravených do 1 dne: 474
Celkem bugů opravených do 7 dnů: 707
Celkem bugů opravených do 14 dnů: 337
Celkem bugů opravených do 30 dnů: 431
Celkem bugů opravených do 61 dnů: 359
Celkem bugů opravených do 183 dnů: 464
openSUSE new
Celkový počet chyb: 7368
Z nich nás ale zajímá jen: 4710
(Protože nepočítáme 1221 DUPLICATE, 294 WORKSFORME, 611 INVALID a 532 WONTFIX)
Neopraveno zůstalo: 1674
Opraveno bylo: 3036
Celkem bugů opravených do 1 dne: 457
Celkem bugů opravených do 7 dnů: 775
Celkem bugů opravených do 14 dnů: 389
Celkem bugů opravených do 30 dnů: 454
Celkem bugů opravených do 61 dnů: 425
Celkem bugů opravených do 183 dnů: 536
gentoo old
Celkový počet chyb: 20603
Z nich nás ale zajímá jen: 13871
(Protože nepočítáme 4179 DUPLICATE, 630 WORKSFORME, 1412 INVALID a 511 WONTFIX)
Neopraveno zůstalo: 5088
Opraveno bylo: 8783
Celkem bugů opravených do 1 dne: 2218
Celkem bugů opravených do 7 dnů: 2037
Celkem bugů opravených do 14 dnů: 851
Celkem bugů opravených do 30 dnů: 989
Celkem bugů opravených do 61 dnů: 1006
Celkem bugů opravených do 183 dnů: 1682
gentoo new
Celkový počet chyb: 13675
Z nich nás ale zajímá jen: 10103
(Protože nepočítáme 2153 DUPLICATE, 355 WORKSFORME, 763 INVALID a 301 WONTFIX)
Neopraveno zůstalo: 3348
Opraveno bylo: 6755
Celkem bugů opravených do 1 dne: 1557
Celkem bugů opravených do 7 dnů: 1518
Celkem bugů opravených do 14 dnů: 695
Celkem bugů opravených do 30 dnů: 855
Celkem bugů opravených do 61 dnů: 935
Celkem bugů opravených do 183 dnů: 1195
kde old
Celkový počet chyb: 10724
Z nich nás ale zajímá jen: 7142
(Protože nepočítáme 1364 DUPLICATE, 966 WORKSFORME, 995 INVALID a 257 WONTFIX)
Neopraveno zůstalo: 5176
Opraveno bylo: 1966
Celkem bugů opravených do 1 dne: 1731
Celkem bugů opravených do 7 dnů: 16
Celkem bugů opravených do 14 dnů: 0
Celkem bugů opravených do 30 dnů: 27
Celkem bugů opravených do 61 dnů: 85
Celkem bugů opravených do 183 dnů: 107
kde new
Celkový počet chyb: 6689
Z nich nás ale zajímá jen: 4612
(Protože nepočítáme 825 DUPLICATE, 425 WORKSFORME, 678 INVALID a 149 WONTFIX)
Neopraveno zůstalo: 3648
Opraveno bylo: 964
Celkem bugů opravených do 1 dne: 276
Celkem bugů opravených do 7 dnů: 145
Celkem bugů opravených do 14 dnů: 61
Celkem bugů opravených do 30 dnů: 81
Celkem bugů opravených do 61 dnů: 117
Celkem bugů opravených do 183 dnů: 284
gnome old
Celkový počet chyb: 20740
Z nich nás ale zajímá jen: 15018
(Protože nepočítáme 3809 DUPLICATE, 0 WORKSFORME, 406 INVALID, 695 NOTABUG, 481 NOTGNOME, 0 NOTXIMIAN a 331 WONTFIX)
Neopraveno zůstalo: 7627
Opraveno bylo: 7391
Celkem bugů opravených do 1 dne: 1843
Celkem bugů opravených do 7 dnů: 1753
Celkem bugů opravených do 14 dnů: 748
Celkem bugů opravených do 30 dnů: 908
Celkem bugů opravených do 61 dnů: 851
Celkem bugů opravených do 183 dnů: 1288
gnome new
Celkový počet chyb: 63421
Z nich nás ale zajímá jen: 35707
(Protože nepočítáme 25159 DUPLICATE, 0 WORKSFORME, 449 INVALID, 645 NOTABUG, 1184 NOTGNOME, 0 NOTXIMIAN a 277 WONTFIX)
Neopraveno zůstalo: 29887
Opraveno bylo: 5820
Celkem bugů opravených do 1 dne: 1447
Celkem bugů opravených do 7 dnů: 1262
Celkem bugů opravených do 14 dnů: 513
Celkem bugů opravených do 30 dnů: 620
Celkem bugů opravených do 61 dnů: 700
Celkem bugů opravených do 183 dnů: 1278